Steps to enable High Availability in Apache Airflow
In a previous post, we discussed Setting up an Apache Airflow Cluster. In this post we’ll talk about the shortcomings of a typical Apache Airflow Cluster and what can be done to provide a Highly Available Airflow Cluster.
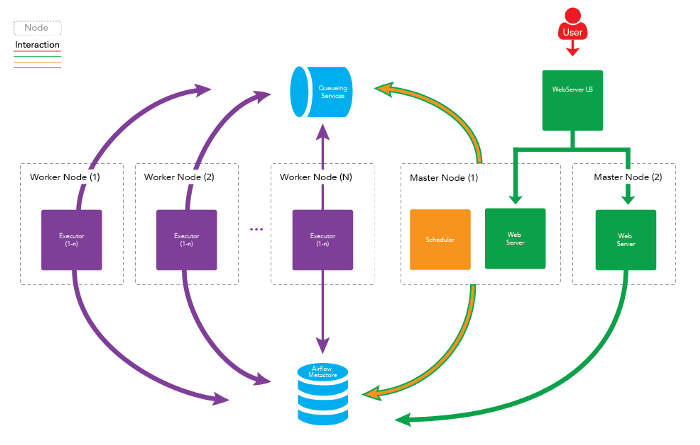
A Typical Apache Airflow Cluster
In a typical multi-node Airflow cluster you can separate out all the major processes onto separate machines. Here are the main processes:
Web Server
A daemon which accepts HTTP requests and allows you to interact with Airflow via a Python Flask Web Application. It provides the ability to pause, unpause DAGs, manually trigger DAGs, view running DAGs, restart failed DAGs and much more.
Scheduler
A daemon which periodically polls to determine if any registered DAG and/or Task Instances needs to triggered based off its schedule.
Executors/Workers
A daemon that handles starting up and managing 1 to many CeleryD processes to execute the desired tasks of a particular DAG.
High Availability in a Typical Apache Airflow Cluster
A typical cluster can provide a good amount of High Availability right off the bat. It does this by allowing for redundancy in most of the core processes listed above:
Web Server
You can have multiple Master Nodes with web servers running on them all load balanced. This means that if one of the masters goes down, then you have at least one other Master available to accept HTTP requests forwarded from the Load Balancer.
Executors/Workers
You can setup multiple Worker nodes. If one of those nodes were to go down, the others will still be active and able to accept and execute tasks.
 Diagram
Problems with the Typical Apache Airflow Cluster
The problem with the traditional Airflow Cluster setup is that there can’t be any redundancy in the Scheduler daemon. If you were to have multiple Scheduler instances running you could have multiple instances of a single task be scheduled to be executed. This can be a very bad thing depending on your jobs. For example, if you were to be running a workflow that performs some type of ETL process, you may end up seeing duplicate data that has been extracted from the original source, incorrect results from duplicate transformation processes, or duplicate data in the final source where data is loaded. So, in the case of setting up an Airflow cluster, you can only have a single Scheduler daemon running on the entire cluster. If this single Airflow Scheduler instance were to crash, your Airflow cluster won’t have any DAGs or tasks being scheduled.
The Solution
There isn’t a way in a plain distribution of Airflow to enable High Availability for the Scheduler. Instead what we did, at Clairvoyant, was to create a process that would allow for a Highly Available Scheduler instance which we call the Airflow Scheduler Failover Controller.
This process tries to ensure that there is always one and only one Scheduler instance running at a time. If one Scheduler instance dies, then the failover controller tries to start it back up again. If it still doesn’t startup on the original machine, it tries to start it up on another, trying to ensure that there’s at least one running in the cluster.
In addition, to prevent this process from becoming the one process that prevents the entire cluster from being highly available (because if this processes dies then the scheduler will no longer be Highly Available), we also allow redundancy in the Scheduler Failover Controller. Once a Scheduler Failover Controller is selected as the ACTIVE instance and all others are listed in a STANDBY state until such a time when the active Failover Controller stops reporting in. It’s recommended that you have the Scheduler Failover Controller running on the same machines as the machines you designate the Schedulers are running on.
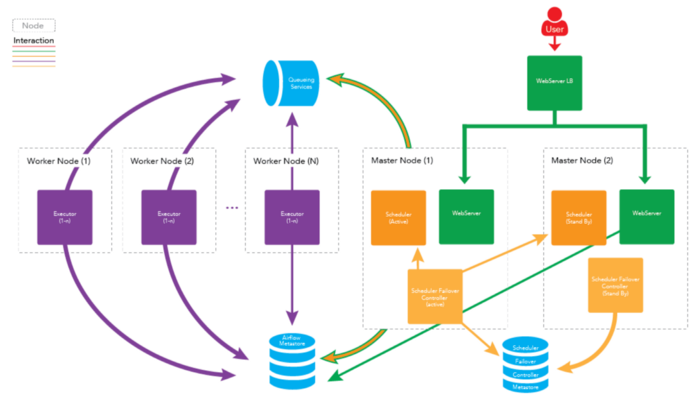 Diagram
How the Scheduler Failover Controller Works
There will ideally be multiple Scheduler Failover Controllers running. One that starts in an ACTIVE state, and at least one other thats is starts in a STANDBY state.
The ACTIVE Scheduler Failover Controller will regularly push a HEART BEAT into a metastore (Supported Metastore’s: MySQL DB, Zookeeper), which the STANDBY Scheduler Failover Controller will read from to see if it needs to become ACTIVE (if the last heart beat is too old, then the STANDBY Scheduler Failover Controller knows the ACTIVE instance is not running).
The ACTIVE Scheduler Failover Controller will poll every X seconds (default is 10 seconds but can be configured) to see if the Airflow Scheduler is running on the desired node. If it is not, the Scheduler Failover Controller will try to restart the daemon. If the Scheduler daemon still doesn’t startup, the Scheduler Failover Controller will attempt to start the Scheduler daemon on another master node in the cluster. As a part of this poll, the ACTIVE Scheduler Failover Controller will also check and make sure that Scheduler daemons aren’t running on the other nodes.
Setup Steps
-
Setup Airflow on all the nodes you want to act in the cluster
-
Use the following documentation: Install Airflow
-
Configure Airflow to use CeleryExecutor
-
Configure each Airflow instance to point to the same External MySQL instance and DB for sql_alchemy_conn and celery_result_backend properties
-
It’s also recommended to follow steps to make MySQL, or whatever type of database you’re using, Highly Available too.
-
If you’re using RabbitMQ as your Queueing Service, then set it up and to be Highly Available
-
Setup RabbitMQ Cluster with HA — Use the following documentation: Install RabbitMQ
-
Setup a Load Balancer for RabbitMQ
-
Configure each Airflow instance to point to the same Queueing Service (set the broker_url argument)
-
Deploy the Airflow Scheduler Failover Controller to all the nodes acting as Failover Controllers (same one acting as a Scheduler)
-
Use the following documentation: Install Airflow Scheduler Failover Controller
-
Configure the Airflow Scheduler Failover Controller
-
Setup a Load Balancer to balance requests between the the Nodes for the Web Server
-
Port Forwarding
-
Port 8080 (HTTP) → Port 8080 (HTTP)
-
Health Check
-
Protocol: HTTP
-
Ping Port: 8080
-
Ping Path: /
-
Startup the Airflow services
-
WebServer and Failover Controller instances to be started on the Master Nodes
-
Worker instances to be started on the Worker Nodes
-
Deploy your DAG to all Airflow instances DAG directory that’s acting as a Master Node
To get the best data engineering solutions for your business, reach out to us at Clairvoyant.