How you can setup and run Apache Airflow as a Cluster for High Availability
In one of our previous blog posts, we described the process you should take when Installing and Configuring Apache Airflow. In this post, we will describe how to setup an Apache Airflow Cluster to run across multiple nodes. This will provide you with more computing power and higher availability for your Apache Airflow instance.
Airflow Daemons
A running instance of Airflow has a number of Daemons that work together to provide the full functionality of Airflow. The daemons include the Web Server, Scheduler, Worker, Kerberos Ticket Renewer, Flower and others. Below are the primary ones you will need to have running for a production quality Apache Airflow Cluster.
Web Server
A daemon which accepts HTTP requests and allows you to interact with Airflow via a Python Flask Web Application. It provides the ability to pause, unpause DAGs, manually trigger DAGs, view running DAGs, restart failed DAGs and much more.
The Web Server Daemon starts up gunicorn workers to handle requests in parallel. You can scale up the number of gunicorn workers on a single machine to handle more load by updating the ‘workers’ configuration in the {AIRFLOW_HOME}/airflow.cfg file.
Example
workers = 4
Startup Command:
$ airflow webserver
Scheduler
A daemon which periodically polls to determine if any registered DAG and/or Task Instances needs to triggered based off its schedule.
Startup Command:
$ airflow scheduler
Executors/Workers
A daemon that handles starting up and managing 1 to many CeleryD processes to execute the desired tasks of a particular DAG.
This daemon only needs to be running when you set the ‘executor ‘ config in the {AIRFLOW_HOME}/airflow.cfg file to ‘CeleryExecutor’. It is recommended to do so for Production.
Example:
executor = CeleryExecutor
Startup Command:
$ airflow worker
How do the Daemons work together?
One thing to note about the Airflow Daemons is that they don’t register with each other or even need to know about each other. Each of them handle their own assigned task and when all of them are running, everything works as you would expect.
-
The Scheduler periodically polls to see if any DAGs that are registered in the MetaStore need to be executed. If a particular DAG needs to be triggered (based off the DAGs Schedule), then the Scheduler Daemon creates a DagRun instance in the MetaStore and starts to trigger the individual tasks in the DAG. The scheduler will do this by pushing messages into the Queueing Service. Each message contains information about the Task it is executing including the DAG Id, Task Id and what function needs to be performed. In the case where the Task is a BashOperator with some bash code, the message will contain this bash code.
-
A user might also interact with the Web Server and manually trigger DAGs to be ran. When a user does this, a DagRun will be created and the scheduler will start to trigger individual Tasks in the DAG in the same way that was mentioned in #1.
-
The celeryd processes controlled by the Worker daemon, will pull from the Queueing Service on regular intervals to see if there are any tasks that need to be executed. When one of the celeryd processes pulls a Task message, it updates the Task instance in the MetaStore to a Running state and tries to execute the code provided. If it succeeds then it updates the state as succeeded but if the code fails while being executed then it updates the Task as failed.
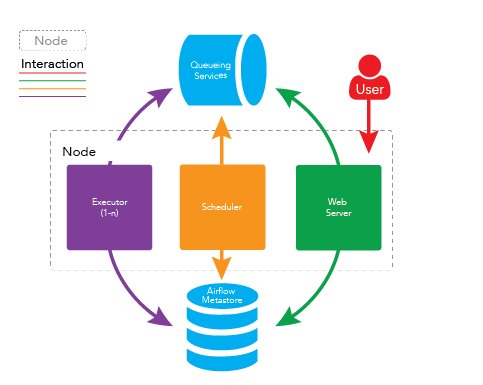
Single Node Airflow Setup
A simple instance of Apache Airflow involves putting all the services on a single node like the bellow diagram depicts.
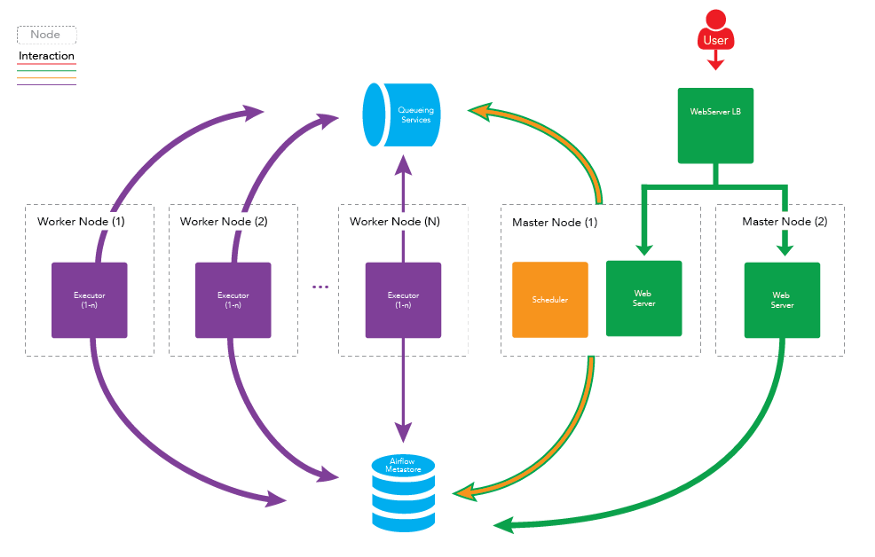
Multi-Node (Cluster) Airflow Setup
A more formal setup for Apache Airflow is to distribute the daemons across multiple machines as a cluster.
%20Airflow%20Setup.png)
Benefits
Higher Availability
If one of the worker nodes were to go down or be purposely taken offline, the cluster would still be operational and tasks would still be executed.
Distributed Processing
If you have a workflow with several memory intensive tasks, then the tasks will be better distributed to allow for higher utilization of data across the cluster and provide faster execution of the tasks.
Scaling Workers
Horizontally
You can scale the cluster horizontally and distribute the processing by adding more executor nodes to the cluster and allowing those new nodes to take load off the existing nodes. Since workers don’t need to register with any central authority to start processing tasks, the machine can be turned on and off without any downtime to the cluster.
Vertically
You can scale the cluster vertically by increasing the number of celeryd daemons running on each node. This can be done by increasing the value in the ‘celeryd_concurrency’ config in the {AIRFLOW_HOME}/airflow.cfg file.
Example:
celeryd_concurrency = 30
You may need to increase the size of the instances in order to support a larger number of celeryd processes. This will depend on the memory and cpu intensity of the tasks you’re running on the cluster.
Scaling Master Nodes
You can also add more Master Nodes to your cluster to scale out the services that are running on the Master Nodes. This will mainly allow you to scale out the Web Server Daemon incase there are too many HTTP requests coming for one machine to handle or if you want to provide Higher Availability for that service.
One thing to note is that there can only be one Scheduler instance running at a time. If you have multiple Schedulers running, there is a possibility that multiple instances of a single task will be scheduled. This could cause some major problems with your Workflow and cause duplicate data to show up in the final table if you were running some sort of ETL process.
If you would like, the Scheduler daemon may also be setup to run on its own dedicated Master Node.
Apache Airflow Cluster Setup Steps
Pre-Requisites
-
The following nodes are available with the given host names:
-
master1
-
— Will have the role(s): Web Server, Scheduler
-
master2
-
— Will have the role(s): Web Server
-
worker1
-
— Will have the role(s): Worker
-
worker2
-
— Will have the role(s): Worker
-
A Queuing Service is Running. (RabbitMQ, AWS SQS, etc)
-
You can install RabbitMQ by following these instructions: Installing RabbitMQ
-
— If you’re using RabbitMQ, it is recommended that it is also setup to be a cluster for High Availability. Setup a Load Balancer to proxy requests to the RabbitMQ instances.
Steps
1.Install Apache Airflow on ALL machines that will have a role in the Airflow
-
You can follow the instructions on our previous blog post: Installing and Configuring Apache Airflow.
2.Apply Airflow Configuration changes to all ALL machines. Apply changes to the {AIRFLOW_HOME}/airflow.cfg file.
-
Change the Executor to CeleryExecutor
executor = CeleryExecutor
-
Point SQL Alchemy to the MetaStore
sql_alchemy_conn = mysql://{USERNAME}: {PASSWORD}@{MYSQL_HOST}:3306/airflow -
Set the Broker URL
-
1. If you’re using RabbitMQ:
broker_url = amqp://guest:guest@{RABBITMQ_HOST}:5672/ -
2. If you’re using AWS SQS:
broker_url = sqs://{ACCESS_KEY_ID}:{SECRET_KEY}@ #Note: You will also need to install boto: $ pip install -U boto -
Point Celery to the MetaStore
celery_result_backend = db+mysql://{USERNAME}:
{PASSWORD}@{MYSQL_HOST}:3306/airflow
3.Deploy your DAGs/Workflows on master1 and master2 (and any future master nodes you might add)
4.On master1, initialize the Airflow Database (if not already done after updating the sql_alchemy_conn configuration)
airflow initdb
5.On master1, startup the required role(s)
-
Startup Web Server
$ airflow webserver
-
Startup Scheduler
$ airflow scheduler
6.On master2, startup the required role(s)
-
Startup Web Server
$ airflow webserver
7.On worker1 and worker2, startup the required role(s)
-
Startup Worker
$ airflow worker
8.Create a Load Balancer to balance requests going to the Web Servers
-
If you’re in AWS you can do this with the EC2 Load Balancer
-
Sample Configurations:
-
— Port Forwarding
-
— > Port 8080 (HTTP) → Port 8080 (HTTP)
-
— Health Check
-
— > Protocol: HTTP
-
— > Ping Port: 8080
-
— > Ping Path: /
-
— > Success Code: 200,302
-
If you’re not on AWS you can use something like haproxy to proxy/balance requests to the Web Servers
-
Sample Configurations:
global
 log 127.0.0.1 local2
 chroot /var/lib/haproxy
 pidfile /var/run/haproxy.pid
 maxconn 4000
 user haproxy
 group haproxy
 daemon
 # turn on stats unix socket
 # stats socket /var/lib/haproxy/stats

defaults
 mode tcp
 log global
 option tcplog
 option tcpka
 retries 3
 timeout connect 5s
 timeout client 1h
 timeout server 1h

# port forwarding from 8080 to the airflow webserver on 8080
listen impala
 bind 0.0.0.0:8080
 balance roundrobin

server airflow_webserver_1 host1:8080 check
 server airflow_webserver_2 host2:8080 check

# This sets up the admin page for HA Proxy at port 1936.
listen stats :1936
 mode http
 stats enable
 stats uri /
 stats hide-version
 stats refresh 30s
9.You’re done!
To get the best data engineering solutions for your business, reach out to us at Clairvoyant.
Additional Documentation
Documentation: https://airflow.incubator.apache.org/
Install Documentation:
https://airflow.incubator.apache.org/installation.html
GitHub Repo: https://github.com/apache/incubator-airflow