Steps to upgrade the CDH Docker instance from JDK1.7 to JDK1.8
 Pre-requisites:
1. Docker installed
2. Cloudera Docker image installed
Follow this link to install the Docker and the Cloudera image. Follow this link authored by Akash Patel to upgrade it to CDH 5.16.
This article focuses on installing the Cloudera services on your local system with the help of Docker. As we all know, Docker is better in so many ways than the usual Virtual Box. They essentially do the same job, but the Docker uses fewer resources from your computer, thus delivering better performance and avoiding the usual headaches during the deployment.
Considering that you have followed the blog in the link above and started the docker services, I am going to proceed with my explanation to install JDK 1.8. This is because, by default, the CDH image of docker comes with JDK 1.7, and if you are someone who wants to learn spark2 along with CDH and its other services, then you should know the importance of JDK1.8 already.
Once the CDH image has been installed, you can check the processes running in the Docker using the below command-
docker ps -a
 Docker Services
As you can see the names, now there are two ways to start your CDH; the first one is manually starting all the ports using the below command-
docker run --hostname=quickstart.cloudera --privileged=true -t -i -p
8888:8888 -p 10000:10000 -p 10020:10020 -p 11000:11000 -p 18080:18080
-p 18081:18081 -p 18088:18088 -p 19888:19888 -p 21000:21000 -p
21050:21050 -p 2181:2181 -p 25000:25000 -p 25010:25010 -p 25020:25020
-p 50010:50010 -p 50030:50030 -p 50060:50060 -p 50070:50070 -p
50075:50075 -p 50090:50090 -p 60000:60000 -p 60010:60010 -p
 60020:60020 -p 60030:60030 -p 7180:7180 -p 7183:7183 -p 7187:7187 -p
 80:80 -p 8020:8020 -p 8032:8032 -p 802:8042 -p 8088:8088 -p 8983:8983
 -p 9083:9083 4239cd2958c6 /usr/bin/docker-quickstart
If you followed the previous blog on how to upgrade to CDH 5.16, you can use another easy way to start the service by using the name, which here is “youthful_haslett”. Yes, I know it sounds weird. But there should be some reason behind these naming conventions. The command to perform this is given below-
docker start youthful_haslett
Now use your process's container ID, ‘fa825ad78e9f’ here. To start the container, use the below command-
docker exec -it fa825ad78e9f /bin/bash
Once it executes the above command, you are going to see something like this on your system-
 Inside Cloudera
As shown below, the java version inside the docker will be JDK1.7.
 Java version inside the CDH image
Now, to upgrade the JDK to 1.8, follow the below steps.
Stop the Cloudera services
Before starting, we need to stop all the Cloudera services, for which we can use the commands shown below-
sudo su
service cloudera-scm-agent stop
service cloudera-scm-server stop
 Services stopped
Installing JDK1.8
Install JDK1.8 using the below command. Doing this is going to update all your CDH services, but we should also make sure that we are changing the environment variables in your bash profile, so that your terminal picks up the path by default.
sudo yum install java-1.8.0-openjdk
Adding environment variables to bash
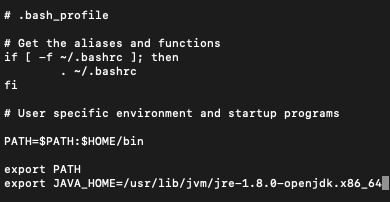
Now, this is one of the most important steps to avoid calling JDK1.8 manually every time. Edit the bash profile as shown below. Do not forget to source the bash profile once it’s edited.
vi ~/.bash_profile

export JAVA_HOME=/usr/lib/jvm/jre-1.8.0-openjdk.x86_64

source ~/.bash_profile
 Use Ctrl + O to save and Ctrl + X to exit
Now, change your working directory to /etc/bashrc and add the following paths.
cd /etc
vi bashrc //add the following at the end of the file

export JAVA_HOME=/usr/lib/jvm/jre-1.8.0-openjdk.x86_64
export JRE_HOME=${JAVA_HOME}
export JDK_HOME=${JAVA_HOME}
export ANT_HOME=/usr/local/apache-ant/apache-ant-1.9.2
export M2_HOME=/usr/local/apache-maven/apache-maven-3.0.4
export
PATH=/usr/local/firefox:/sbin:$JAVA_HOME/bin:$ANT_HOME/bin:$M2_HOME/b
in:$PATH

source bashrc
Last few important steps
Add the following path to all the files shown below.
export JAVA_HOME="/usr/lib/jvm/jre-1.8.0-openjdk.x86_64"

vi /etc/default/cloudera-scm-server
vi /etc/default/hadoop
vi /etc/default/hadoop-0.20-mapreduce
vi /etc/default/hadoop-hdfs-datanode
vi /etc/default/hadoop-hdfs-journalnode
vi /etc/default/hadoop-hdfs-namenode
vi /etc/default/hadoop-hdfs-secondarynamenode
vi /etc/default/hadoop-yarn-nodemanager
vi /etc/default/spark
vi /etc/default/impala
vi /etc/default/zookeeper
vi /etc/default/solr
Time to restart the Cloudera service again
To see all the changes reflected, we need to start the services again.
service cloudera-scm-agent start
service cloudera-scm-server start
 Services started again
Verifying the new version of JDK
Check for the version of Java installed now.
java -version
 JDK1.8 installed successfully
Final Step in configuring all the services to JDK1.8
Once all the above steps are done, we can log in to http://localhost:7180/ to see the UI of Cloudera Manager. The next step is to go to Hosts → All hosts →configuration(on right top) and search for Java, which is going to look like the image below.
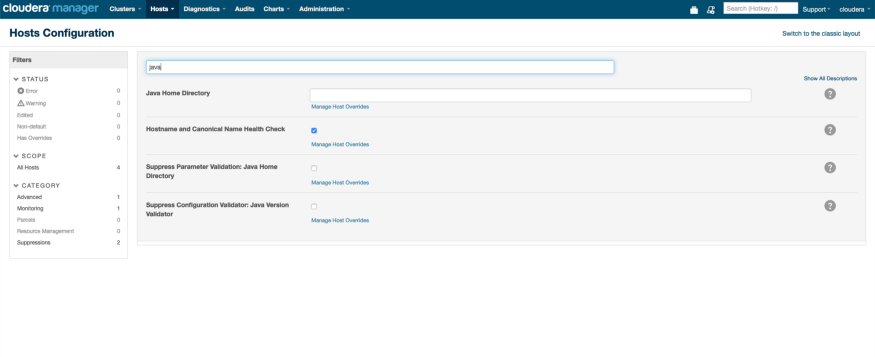 Cloudera Manager UI
Here, you need to enter the path of the new JDK1.8 that has been installed. To find that, you can use the command below-
where java

/usr/lib/jvm/jre-1.8.0-openjdk.x86_64/bin/java //path of the jdk
installed
Take the path /usr/lib/jvm/jre-1.8.0-openjdk.x86_64 and paste it in the java home directory in the Cloudera hosts configuration. Once this is done, restart the Cloudera management services and the quickstart on the CDH manager's home page. This will help to restart all the stale configurations. Once all these are done, your services are going to glow green. (Happy face :) )
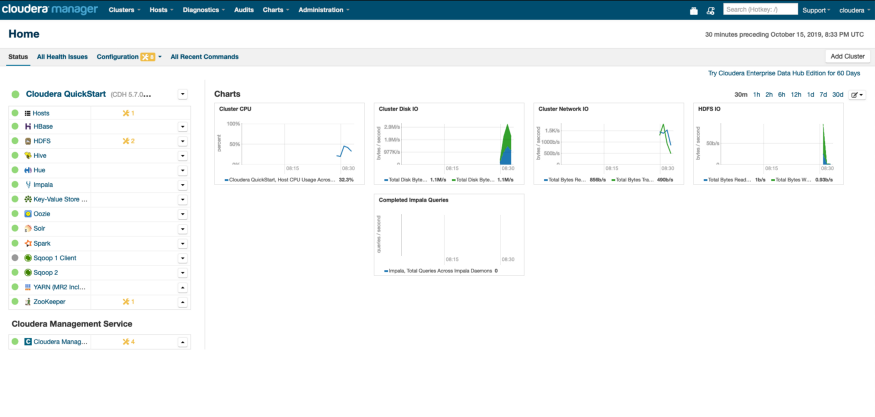 All Green services
Verify if the CDH services are picking up JDK1.8
Use this command to see if your services are picking up the right JDK.
ps -eaf | grep hadoop
Your service should start with JDK1.8
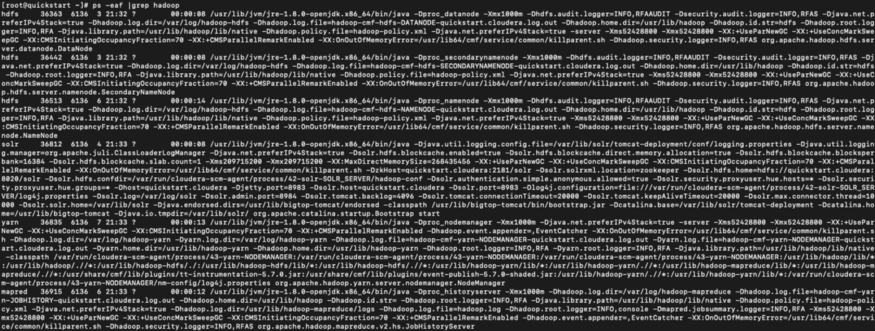 List output showing the usage of JDK1.8
So, now, if you check Cloudera manager for the JDK information Support
 JDK1.8 in Cloudera Manager
Learn how to migrate a single CDH Cluster from One CM to Another in our blog here. To get the best data engineering solutions for your business, reach out to us at Clairvoyant.