The upgrade procedure from CM/CDH 5.15.2 to CDP Private Cloud Base 7.1.6
Cloudera recently announced a new version of the CDP Data Center, that allows customers to migrate or upgrade from their legacy CDH5 clusters and drive even more value from their data by gaining access to new features and functionality to enhance their big data experience.
The latest release brings in new capabilities and further enhancements that both CDH5 and HDP2 customers have been looking forward to for a while.
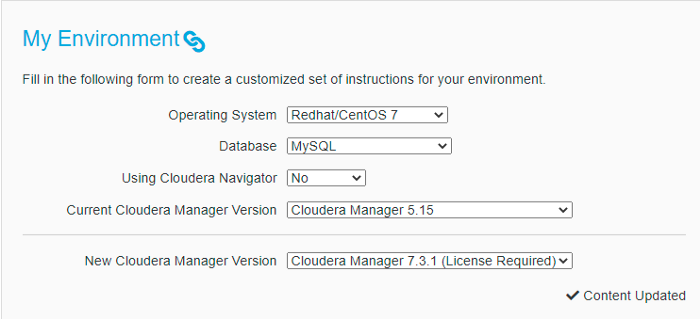
We, at Clairvoyant, go through efficient and strategic planning prior to starting the upgrade process. This helps us to get the upgrade completed smoothly and with reduced downtime. Below, we have listed a step-by-step process for the upgrade. For all your customized requests, reach out to us here.
Upgrading CDP Private Cloud Base consists of two major steps:
-
Upgrading Cloudera Manager
-
Upgrading the Cluster
You are not required to upgrade Cloudera Manager and the cluster at the same time, but the versions of Cloudera Manager and the cluster must be compatible. The major+minor version of Cloudera Manager must be equal to or higher than the major+minor version of CDH or Cloudera Runtime.
Source Version: CM 5.15.2 and CDH 5.15.2
Target Version: CM 7.3.1 and CDP 7.1.6
High-level steps to upgrade the Cloudera cluster consists following:
-
Pre-upgrade tasks
-
Upgrade the cluster: a) Upgrade Cloudera Manager b) Upgrade CDH cluster
-
Post upgrade tasks
Before we start the upgrade process, we must check for the points below:
Prepare to Upgrade
-
Review the Supported Upgrade Paths for your upgrade.
-
Review the Requirements and Supported Versions for your upgrade
-
Review the Release Notes for the CDP Private Cloud Base you are upgrading to.
-
If necessary, Upgrade the JDK.
-
If necessary, Upgrade the Operating System.
-
Perform any needed pre-upgrade transition steps for the components deployed in your clusters. See CDP Private Cloud Base Pre-upgrade transition steps.
Below are the steps to upgrade the Cloudera cluster from CDH 5.15.2 to CDP 7.1.6.
Getting Started Upgrading Cloudera Manager:
Collect Information:
Log in to the Cloudera Manager Server host:
The current version of the operating system

[centos@ip-172–31–93–81 ~]$ lsb_release -a

LSB Version: :core-4.1-amd64:core-4.1-noarch

Distributor ID: CentOS

Description: CentOS Linux release 7.9.2009 (Core)

Release: 7.9.2009

Codename: Core

[centos@ip-172–31–93–81 ~]$
Database Parameters:
[centos@ip-172–31–93–81 ~]$ sudo cat /etc/cloudera-scm-server/db.properties

# Auto-generated by scm_prepare_database.sh on Sun May 16 05:57:09 UTC 2021

#

# For information describing how to configure the Cloudera Manager Server

# to connect to databases, see the “Cloudera Manager Installation Guide.”

#

com.cloudera.cmf.db.type=mysql

com.cloudera.cmf.db.host=ip-172–31–93–81.ec2.internal

com.cloudera.cmf.db.name=scm

com.cloudera.cmf.db.user=scm

com.cloudera.cmf.db.setupType=EXTERNAL

com.cloudera.cmf.db.password=****

[centos@ip-172–31–93–81 ~]$
CM and JDK version:
[centos@ip-172–31–93–81 ~]$ rpm -qa | grep cloudera

cloudera-manager-daemons-5.15.2–1.cm5152.p0.2.el7.x86_64

cloudera-manager-agent-5.15.2–1.cm5152.p0.2.el7.x86_64

cloudera-manager-server-5.15.2–1.cm5152.p0.2.el7.x86_64

[centos@ip-172–31–93–81 ~]$

Preparing to Upgrade Cloudera Manager
Access to Cloudera Manager binaries for production purposes requires authentication. To download the software, you must first have an active subscription agreement and obtain a license key file along with the required authentication credentials (username and password).
Backing Up Cloudera Manager
Upgrading the Cloudera Manager
Create a file named /etc/yum.repos.d/cloudera-manager.repo with the following content:
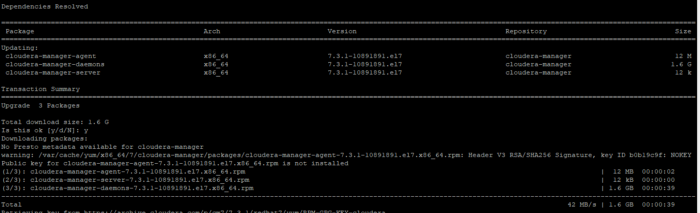
[centos@ip-172–31–93–81 ~]$ cat /etc/yum.repos.d/cloudera-manager.repo

[cloudera-manager]

name=Cloudera Manager 7.3.1

baseurl=https://archive.cloudera.com/p/cm7/7.3.1/redhat7/yum/

gpgkey =https://archive.cloudera.com/p/cm7/7.3.1/redhat7/yum/RPM-GPG-KEY-cloudera

username=username

password=*****

gpgcheck=1

enabled=1

autorefresh=0

type=rpm-md

[centos@ip-172–31–93–81 ~]$

Stop the Cloudera Management Service from CM UI.

Stop the cloudera manager server:

sudo systemctl stop cloudera-scm-server

Stop the Cloudera Manager Agent:

sudo systemctl stop cloudera-scm-agent

Upgrade the packages:

sudo yum clean all

sudo yum upgrade cloudera-manager-server cloudera-manager-daemons
cloudera-manager-agent
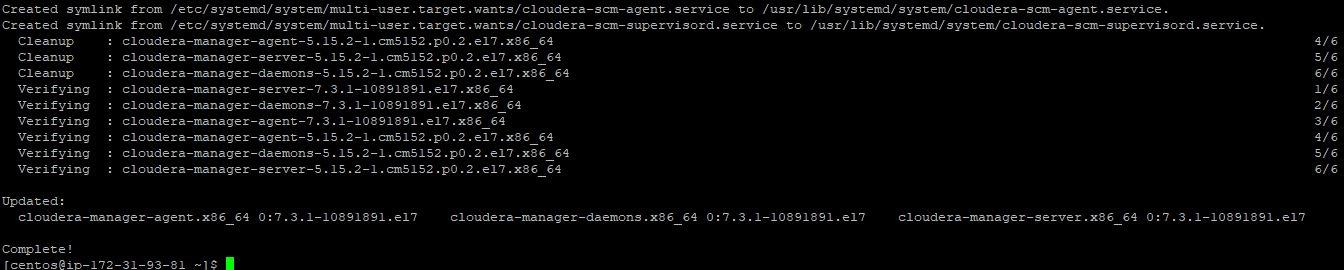
Verify that you have the correct packages installed
rpm -qa ‘cloudera-manager-*’

[centos@ip-172–31–93–81 ~]$ rpm -qa ‘cloudera-manager-*’

cloudera-manager-agent-7.3.1–10891891.el7.x86_64

cloudera-manager-server-7.3.1–10891891.el7.x86_64

cloudera-manager-daemons-7.3.1–10891891.el7.x86_64

[centos@ip-172–31–93–81 ~]$

Start the Cloudera Manager Agent:

sudo systemctl start cloudera-scm-agent

Start the Cloudera Manager Server:

sudo systemctl start cloudera-scm-server
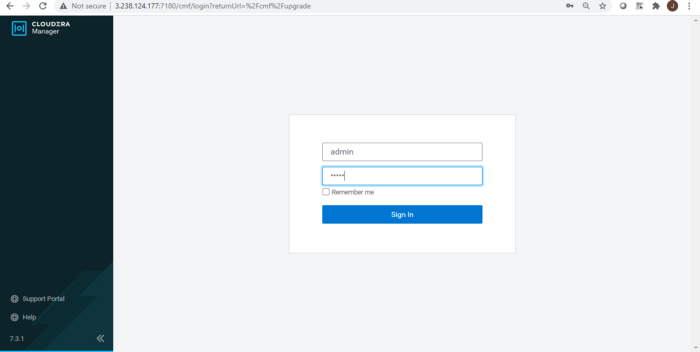
Use a Web browser to open the Cloudera Manager Admin Console using the following URL:
http://{cloudera_Manager_server_hostname}:7180/cmf/upgrade
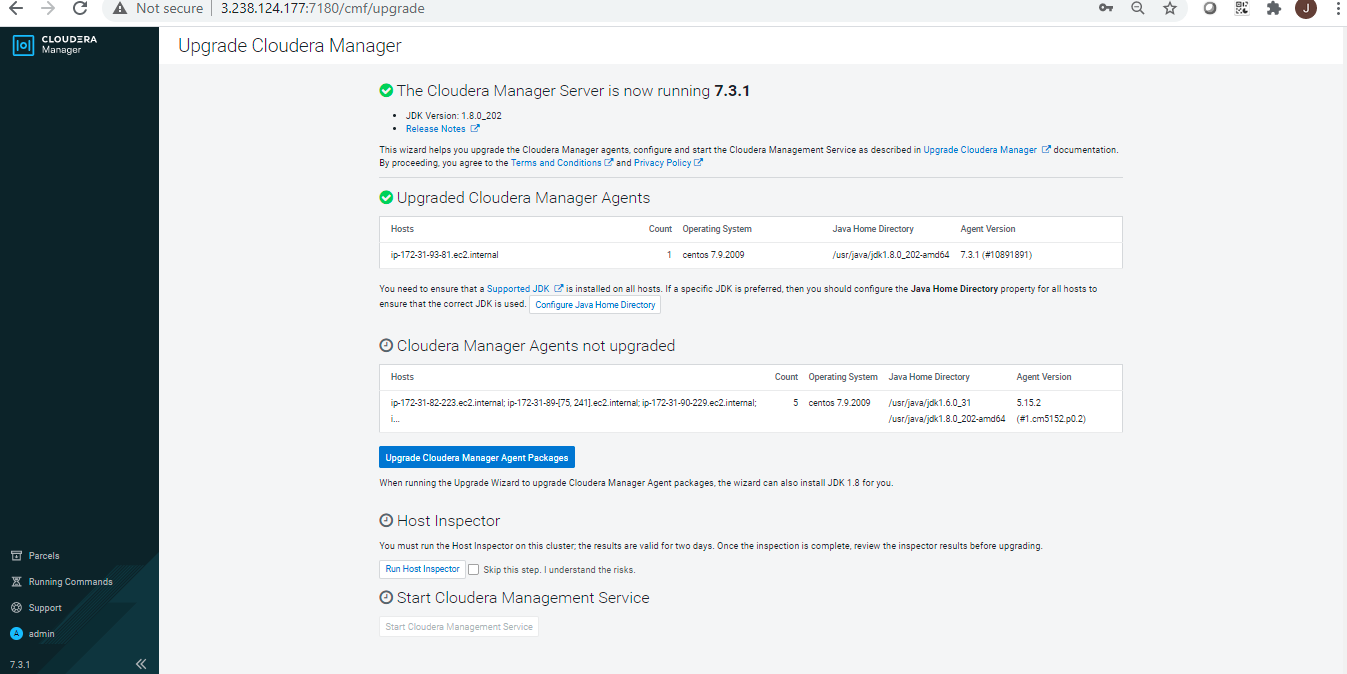
It can take several minutes for the Cloudera Manager Server to start, and the Cloudera Manager Admin Console is unavailable until the server startup is complete and the Upgrade Cloudera Manager page displays. Continue with the steps on the next page to upgrade the Cloudera Manager Agents.
Make sure you have updated the license key at the location below.
/etc/cloudera-scm-server/
Upgrading the Cloudera Manager Agents
The Upgrade Cloudera Manager screen displays:
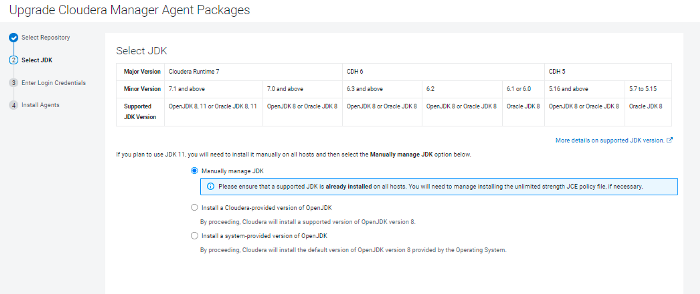
Select the JDK option that is applicable in your case,
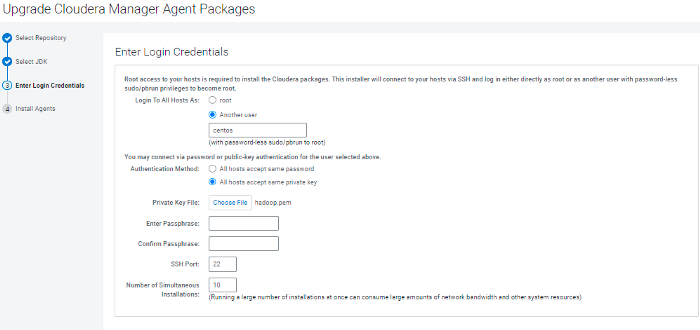
Provide the user credentials that are having Sudo access to all the cluster hosts:
When the installations are complete, click Finish.
The Upgrade Cloudera Manager page displays the status of the upgrade. If you see a message listing Cloudera Manager Agents not upgraded, wait a few minutes for the agents to the heartbeat and then click the Refresh button.
After the Agents are all upgraded, Click Run Host Inspector to run the host inspector. Inspect the output and correct any warnings. If problems occur, you can make changes and then rerun the inspector.
Confirm that you want to start the Cloudera Management Service by clicking Continue.

After the Cloudera Management Service has started, click Finish.
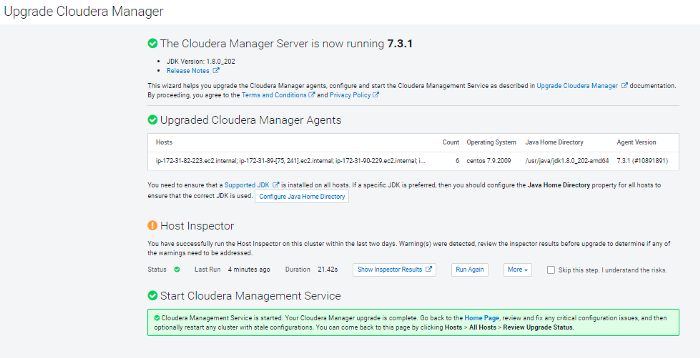
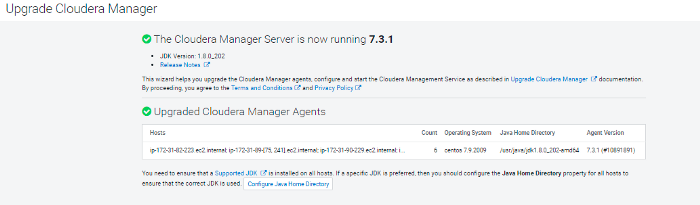
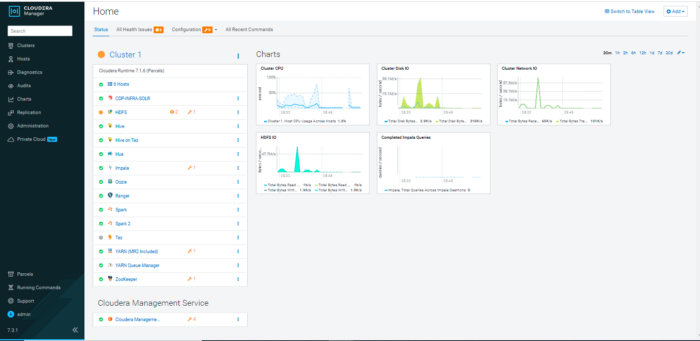
The CM upgrade is now complete
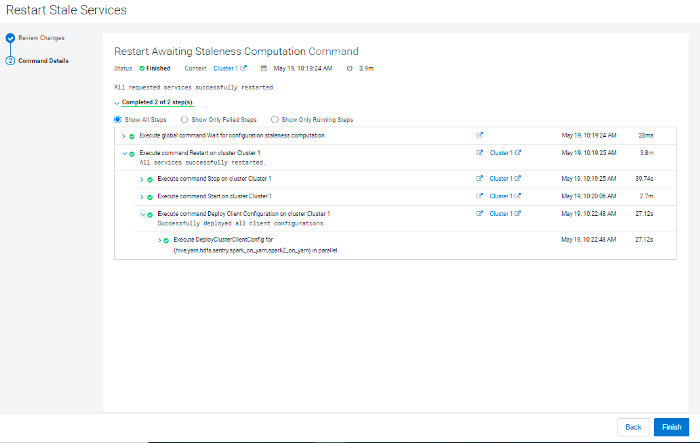
You may need to restart any cluster services if they indicate stale configurations.
Restart stale services
In-Place Upgrade CDH to CDP Private Cloud Base
CDP Private Cloud Base Pre-upgrade transition steps:
For upgrades from CDH 5 clusters with Sentry to Cloudera Runtime 7.1.1 (or higher) clusters where Sentry privileges are to be transitioned to Apache Ranger, the cluster must have Kerberos enabled before upgrading.
Transitioning the Sentry service to Apache Ranger
Export sentry permissions from CM UI:
It will be saved in the hdfs location.

Configuring a Ranger Database: MySQL:
Login to the DB with the root user and execute the below command:
CREATE DATABASE ranger;

CREATE USER ‘rangeradmin’@’%’ IDENTIFIED BY ‘cloudera’;

CREATE USER ‘rangeradmin’@’localhost’ IDENTIFIED BY ‘cloudera’;

CREATE USER ‘rangeradmin’@’ip-172–31–89–241.ec2.internal’
IDENTIFIED BY ‘cloudera’;

GRANT ALL PRIVILEGES ON ranger.* TO ‘rangeradmin’@’%’;

GRANT ALL PRIVILEGES ON ranger.* TO ‘rangeradmin’@’localhost’;

GRANT ALL PRIVILEGES ON ranger.* TO ‘rangeradmin’@’ip-172–31–89–
241.ec2.internal’;

FLUSH PRIVILEGES;
Getting Started Upgrading a Cluster
https://docs.cloudera.com/cdp-private-cloud/latest/upgrade-cdh/topics/ug_cdh_upgrade_before.html
Preparing to Upgrade a Cluster:
If the cluster uses Hive, validate the Hive Metastore Schema:
Back Up Databases

mysqldump -u root -p — all-databases > all-db-CDH-backup-`date +%F`-
CM.sql

Back Up ZooKeeper

sudo cp -rp /var/lib/zookeeper/ /var/lib/zookeeper-backup-`date
+%F`CM7.3.1-CDH5.15

Back Up HDFS

Journal node edit dir:

cp -rp /dfs/jn /dfs/jn-CM7.3.1-CDH5.15
On all NameNode hosts, Back Up the NameNode runtime directory. Run the following commands
mkdir -p /etc/hadoop/conf.rollback.namenode

cd /var/run/cloudera-scm-agent/process/ && cd `ls -t1 | grep -e
“-NAMENODE\$” | head -1`

cp -rp * /etc/hadoop/conf.rollback.namenode/

rm -rf /etc/hadoop/conf.rollback.namenode/log4j.properties

cp -rp /etc/hadoop/conf.cloudera.hdfs/log4j.properties /etc/hadoop
/conf.rollback.namenode/
Back up the runtime directory for all DataNodes. Run the following commands on all DataNodes
mkdir -p /etc/hadoop/conf.rollback.datanode/

cd /var/run/cloudera-scm-agent/process/ && cd `ls -t1 | grep -e “-
DATANODE\$” | head -1`

cp -rp * /etc/hadoop/conf.rollback.datanode/

rm -rf /etc/hadoop/conf.rollback.datanode/log4j.properties

cp -rp /etc/hadoop/conf.cloudera.HDFS_service_name/log4j.properties
/etc/hadoop/conf.rollback.datanode/
Back up the required services as per the Cloudera documentation
Backup the Cloudera manager
Complete Pre-Upgrade steps for upgrades to CDP Private Cloud Base
https://docs.cloudera.com/cdp-private-cloud/latest/upgrade-cdh/topics/ug_cdh_upgrade_cdp_pre.html
Removed Flume service from Cloudera manager.
YARN: Decommission and recommission the YARN NodeManagers but do not start the NodeManagers.
HDFS: Check the maximum value of the JVM heap usage for the DataNodes on your cluster. Use the Java Heap Size of DataNode in Bytes property to configure the value. If the usage is greater than 70% of the configured JVM Heap Size, then increase the Java Heap Size of the DataNode further by about 30%.
Access Parcels: Parcels contain the software used in your CDP Private Cloud Base clusters. If Cloudera Manager has access to the public Internet, Cloudera Manager automatically provides access to the latest version of the Cloudera Runtime 7 Parcels directly from the Cloudera download site.
If Cloudera Manager does not have access to the internet, you must download the Parcels and set up a local Parcel repository. See Configuring a Local Parcel Repository. Enter the URL of your repository using the steps below.
If you want to upgrade to a different version of Cloudera Runtime 7, Add the parcel URL in the Remote Parcel Repository URLs section.
Enter Maintenance Mode for CMS and CDH cluster.
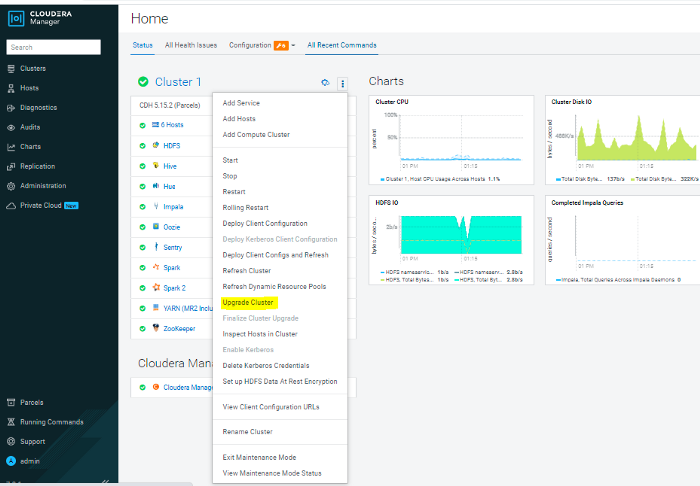
Run the Upgrade Cluster Wizard
Log in to the Cloudera Manager Admin Console.
Click the Actions menu and select Upgrade Cluster.
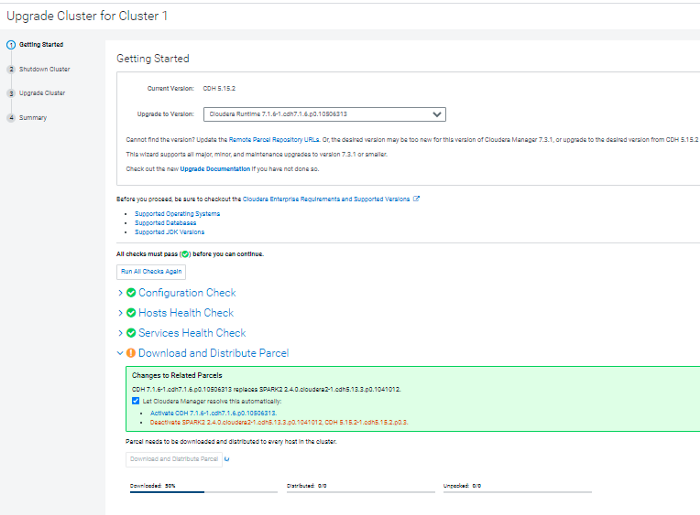
The Getting Started screen of the Upgrade Wizard displays.
Click the Upgrade to Version: drop-down and select the version of Cloudera Runtime for your upgrade. The wizard now runs several checks to ensure that your cluster is ready for an upgrade. You must resolve any reported issues before continuing.

Click the Download and Distribute Parcel button: The parcel downloads from the Remote Repository URL you specified. After it is downloaded, Cloudera Manager distributes the parcel to all of the cluster hosts and unpacks it. Depending on network bandwidth, this process may take some time.
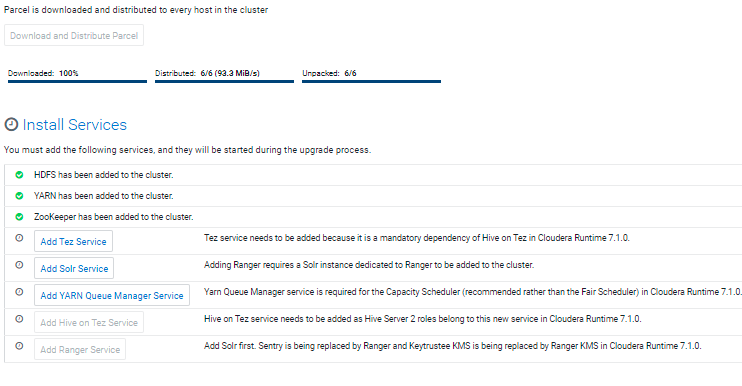
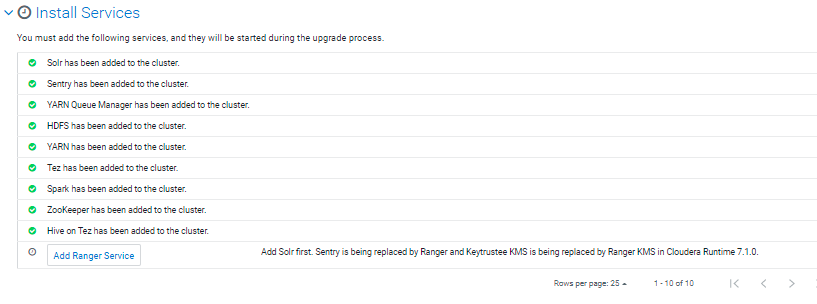
Add services as per the “Install services” section: Tez, Solr, etc.
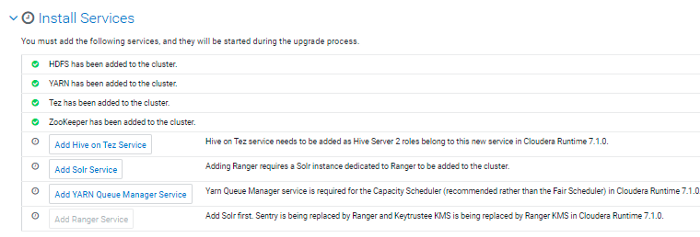
Add Hive on Tez Service.
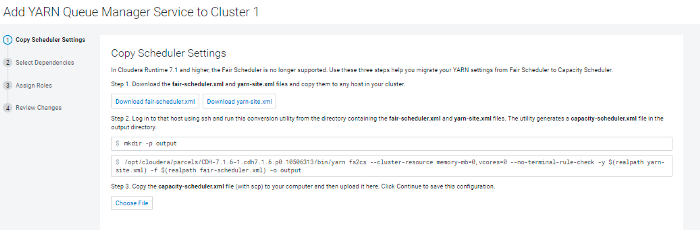
Add YARN Queue Manager service:
The Sentry service is replaced by Apache Ranger in CDP Private Cloud Base. If the cluster has the Sentry service installed, you can migrate to Apache Ranger.
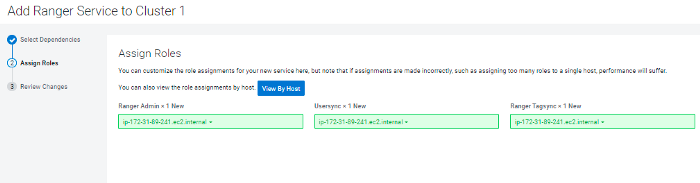
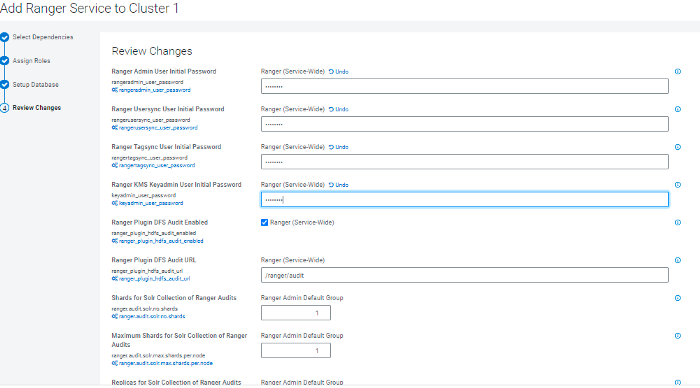
Add Ranger service to the cluster:
Assign Ranger roles to the cluster hosts:
Enter the ranger database details:
DB Type, DB Hostname, DB name, Username, and Password

Set up the ranger user’s password as per the snippet:
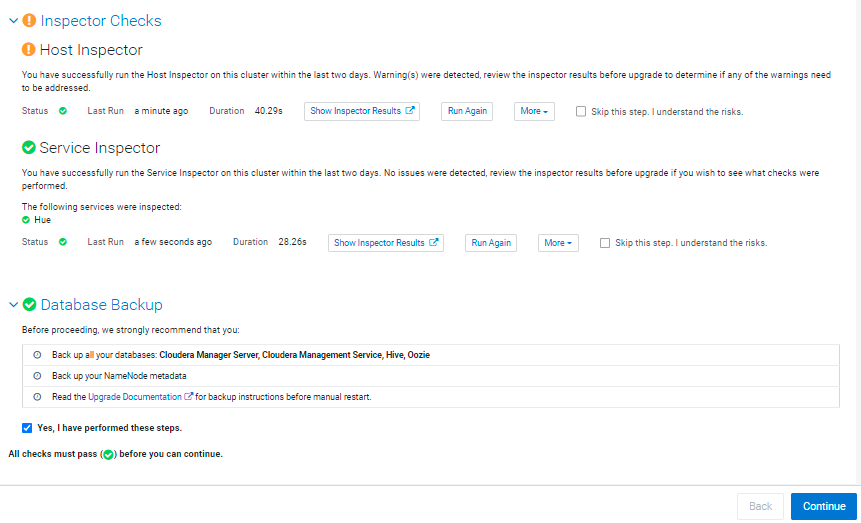
The Other Tasks section lists other tasks or reminders to note before continuing. Run the Host inspector and Service Inspector checks to validate any issues.

If all the above tasks are complete and Host Inspector, Service inspector results are good, then proceed with the next step:
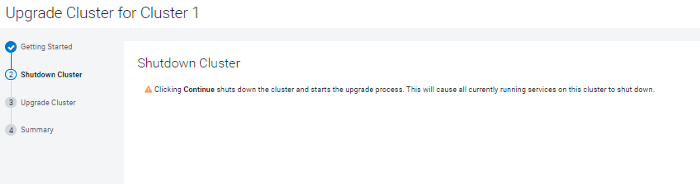
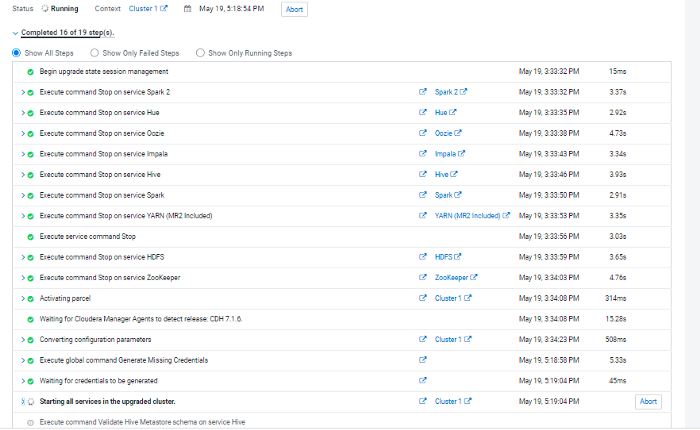
Upgrade the cluster: this window will stop the cluster services and starts with the upgrade process.

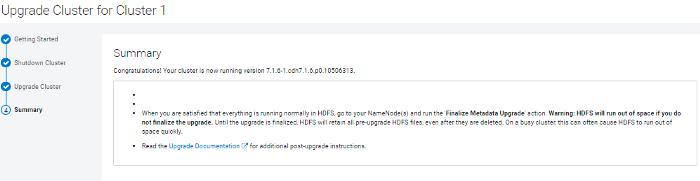
Congratulations! Your cluster is now running version 7.1.6–
1.cdh7.1.6.p0.10506313.
Refresh/restart the service if any services show stale configuration.
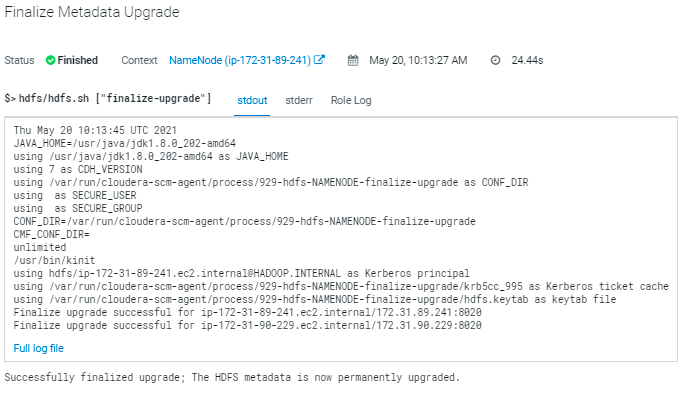
Finalize the HDFS Upgrade:
To determine if you can finalize the upgrade, run important workloads and ensure that they are successful. After you have finalized the upgrade, you cannot roll back to a previous version of HDFS without using backups. Verifying that you are ready to finalize the upgrade can take a long time.

Complete Post-Upgrade steps for upgrades to CDP Private Cloud Base:
Some components might require additional steps after you complete the upgrade to CDP Private Cloud Base:
Note
If service-specific instructions are not displayed on this page, then there are no post-upgrade steps required for your upgrade.
CM/CDH to CDP Private cloud base upgrade process completes here.
Now, It's time to run a Smoke test for all the Hadoop services to verify everything is good.
Learn how to manage Apache Kafka pragmatically with our blog post here. For all your requirements of data engineering solutions, contact us at Clairvoyant.