So your company has some Big Data needs and decided to use Hadoop for processing all the data. As a developer, you wonder where to start? You download and install Hadoop from Apache. You get started relatively quickly and begin writing your first Map Reduce job. Pretty soon, you realize you need a workflow engine like Oozie, and soon after that, you think Hbase might be a good fit for what you are trying to accomplish or use Hive instead of writing Java code for Map Reduce.
The Hadoop ecosystem has grown quite a bit, and manually installing each piece can become frustrating and time-consuming. A low barrier to being productive quickly with Hadoop technologies is to use a vendor distribution like Cloudera. Since we use the Cloudera distribution at BlueCanary, the rest of this tutorial will use Cloudera’s distribution of Hadoop.
Cloudera has a prebuilt developer VM that has all the major components and technologies used in the enterprise Hadoop stack. It includes Hadoop, Hive, Hbase, Oozie, Impala, and Hue. Explaining each one is out of the scope for this post, and I will elaborate on each one in future posts. Hue, however, is worth giving a quick mention to. Hue is a web-based UI for accessing HDFS, monitoring jobs, viewing logs, running Hive and Impala queries, and many other nice features which can make you productive fast.
Although the VM is a very good start, some annoyances can arise. For example, you have to move your code to the VM, and you cannot interact with it like you would with a cluster out of the box. Also, VM can be prone to corruption, and when that happens, you may lose the code that you were working on in the VM.
A few simple steps can make the VM act like a cluster to get around this. Developing and testing in this manner also leads to much smoother deployments to your production cluster.
Step 1: Download VM
The VM can be downloaded directly from Cloudera here.
Step 2: Load VM on Virtual Box and Configure
Open Virtual Box and click on “File -> Import Appliance…”
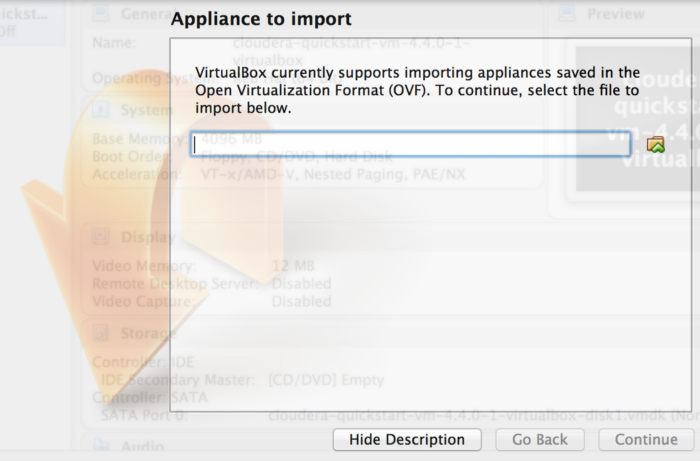
From the file dialog, open “cloudera-quickstart-vm-4.4.0–1-virtualbox.ovf” which will be in the decompressed (or unzipped) Cloudera VM download
Setup “Network Adapter 2” in Network Settings in Virtual Box as “Host-only Adapter”.
When setting up “Host-only Adapter”, If the “Name” drop-down is showing “Not selected” only, then cancel this and go back to Virtual Box preferences (“Virtual Box -> preferences ->network)
Select “Host-Only Networks” then “Add”, and a new entry will be created (something like “vboxnet0”). Click “OK”. Now go back to Network Settings of the VM, and this time, Adapter 2 should show vboxnet0 in the “Name” drop-down. Select “vboxnet0”.
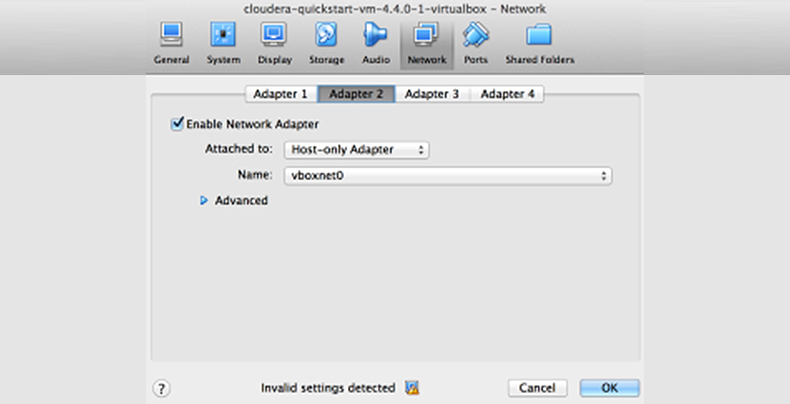
Update Virtual Box to the latest if you cannot add it in this manner. The menu might be present on the older version but may throw an exception/error message when you attempt to add.
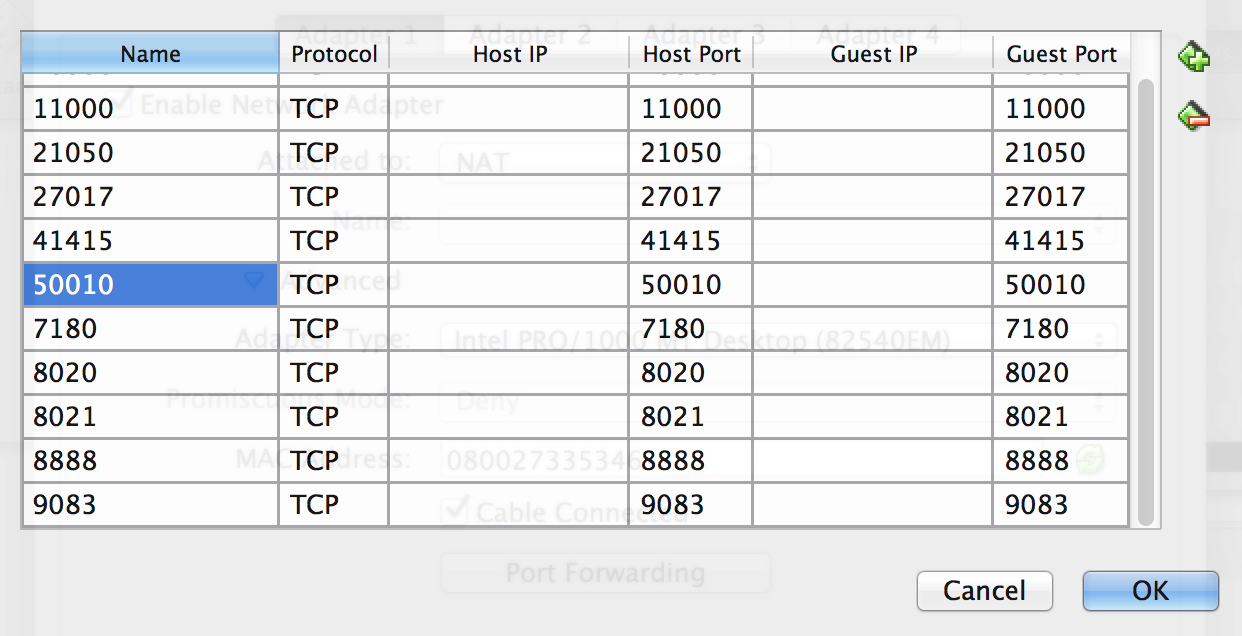
Add Port 50010 to NAT adapter
Open the VM Network Settings
Go to Adapter 1. It should say ‘Attached to:’ NAT
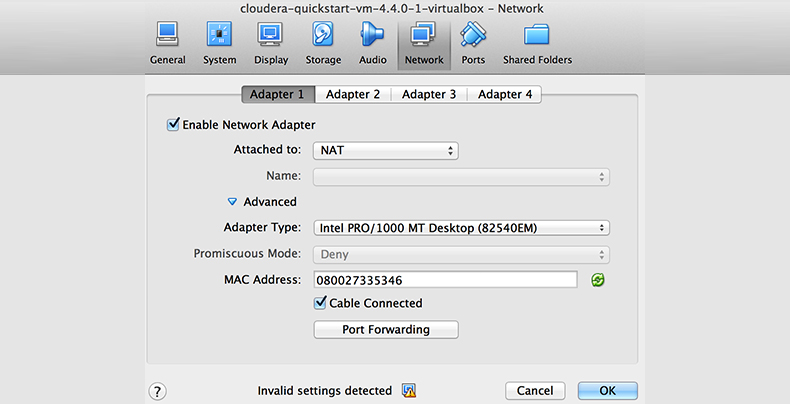
Note: The “Host-only Adapter” is needed for the Host machine to access the guest VM (CDH).
Step 3: Setup to Access VM as Cluster
Perform the following steps on the guest VM:
Create the same user from your host machine on the VM. Example add user jdoe to Cloudera group with password “test”:
Edit the host file on the host machine and add an IP entry for the virtual box:
For Example — 192.168.56.101 localhost.localdomain
Note: This has to be the 192.X.X.X IP and NOT 10.X.X.X of the VM. If you do not have the 192.X.X.X IP, your “host adapter” network setting in Virtual Box is not set up correctly.
Step 4: Setup Oozie for Running Hive Actions and start Hiveserver2 for JDBC Access
On virtual box, execute the following commands using hdfs user:
Note: now you can specify the HDFS location to this file in your hive action using the Oozie <job-xml> </job-xml> element for the Hive action.
Start hive2 server on VM for JDBC access:
You can now access your VM as a cluster from your host machine. Give it a try; the following URL should bring up Hue:
http://localhost.localdomain:8888/
For accessing HDFS from Java Hadoop API using the following for core-site.xml:
For Oozie, give the following for JobTracker and NameNode configs:
You are all set to develop your big data app now! You can access HDFS, launch Oozie jobs, run Hive queries via JDBC, and much more from your host machine. This makes interacting with the VM the same as interacting with a Hadoop cluster running Cloudera’s distribution. In future posts, I will dive into the details of each technology.
Also, learn how to install Apache Kafka and Apache Kudu on Cloudera’s Quickstart VM in our blog. To get the best artificial intelligence solutions for your business, reach out to us at Clairvoyant.