Take your Big Data Spark Streaming job out of the Test Environment and get it ready for prime-time in Production
The Apache Spark project has become an essential tool in a Big Data Engineers toolkit. It includes many capabilities ranging from a highly performant Batch processing engine to a near-real-time Streaming Engine.
Spark Streaming
At Clairvoyant, we’ve been working with clients interested in building Highly Performant Real-time Big Data systems for their business. Many use cases have come up, including Alert Engines, Processing IoT Data, and much more. We’ve dabbled in several technologies, including Apache Nifi, Apache Flume, Apache Flink, and more. But one of our favorite technologies to use is Spark Streaming.
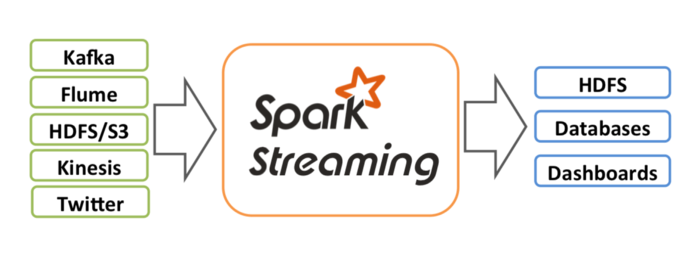
Spark Streaming is an extension to Core Apache Spark that enables scalable, high-throughput, fault-tolerant stream processing of live data streams. Source data streams can be any of the following as described in the below image and more.
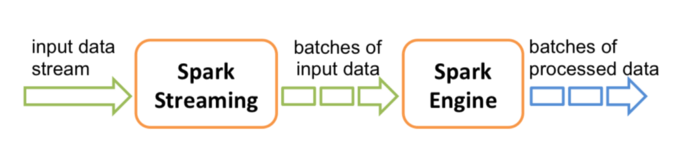
Under the covers, Spark Streaming operates with a micro-batch architecture. This means that periodically (every X number of seconds), Spark Streaming will trigger a job run on the Spark Engine. During this time, Spark will pull messages from some source, process the data using the Directed Acyclic Graph (DAG) you defined, and save the data to the location you specify as a Sink.
While implementing Big Data Spark Streaming solutions, we’ve found we’ve needed to implement some additional steps to get Spark Streaming ready for prime time on the Production cluster. This article describes the primary steps.
Starting Point Code
If we talk about how we can take a Spark Streaming job and get it ready for Production, we first need a Spark Streaming job to improve. The below code will represent our starting point:
The above code does the following:
- Creates the StreamingContext and defines the batch interval as 2 seconds
- Establishes a Connection to Kafka and creates a DStream
- Runs a word count on the RDDs in the DStream
- Prints the results to the Console
- Starts up the StreamingContext
In summary- it’s a simple word count example using Apache Kafka as its source.
Use YARN Cluster Mode
First, let’s review how you start up your spark application:
- Build your JAR (or Python File)
- Execute the spark-submit Command:
$ spark-submit --class “org.apache.spark.testSimpleApp”
--master local[4] /path/to/jar/simple-project_2.11–1.0.jar
In the above spark-submit Command, we’re specifying the master as local[4]. This means that you’re running the Spark Application in local mode and not on the cluster where the data resides.
First, let’s go over the Spark Architecture:
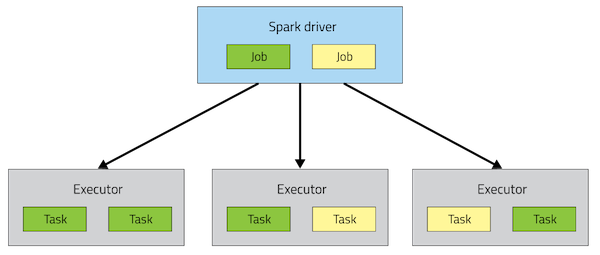
In the above diagram, we can see that there’s a Spark Driver process. This is our master process which contains all the necessary procedures and jobs that need to be executed (contains the DAGs you’ve defined in your Java, Scala, or Python code). The Driver process sends tasks to Executor processes to be completed and ensures that they are completed successfully before exiting.
In almost every case we’ve seen, we usually run Spark Applications on a Big Data Hadoop Cluster where YARN (Yet Another Resource Negotiator) is available. So once your code is tested and ready for production, it makes sense to utilize YARN as your resource manager for allocating execution spaces for your Spark Driver and Executor processes. You can do this by specifying YARN as the master:
Spark Version ≤1.6.3
YARN Client Mode: --master yarn-client
YARN Cluster Mode: --master yarn-cluster
Spark Version ≥ 2.0
YARN Client Mode: --master yarn --deploy-mode client
YARN Cluster Mode: --master yarn --deploy-mode cluster
Above, I’ve listed 2 modes: Client and Cluster. The difference between the two is basically where the Spark Driver is Running- on the Client or the Cluster. Let’s go into more detail:
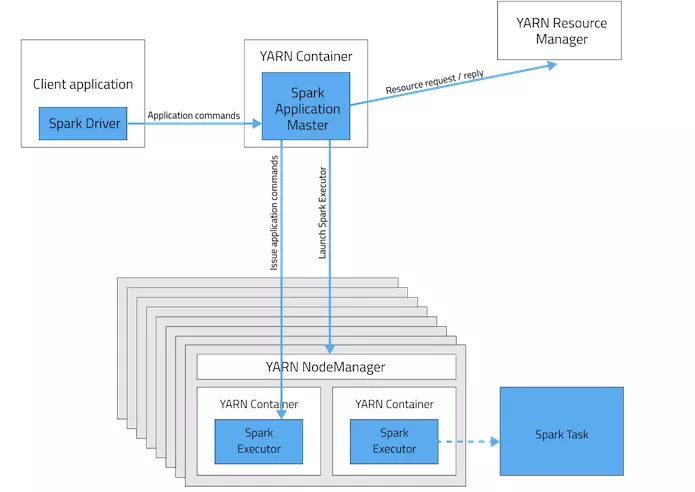
YARN Client Mode
In Client mode, the Spark Driver is running on the Client machine (or the same machine you submit the spark-submit Command from). We see most organizations running all of their Spark Applications in this mode. In the case where you’re running Spark Batch processes, this is an Ok practice. However, there’s a problem with doing the same with Spark Streaming Applications.
Spark Streaming Applications are processes that will be essentially running forever. But what if the machine where the Spark Streaming Application is running goes down? This would result in the Application itself being killed off.
YARN Cluster Mode
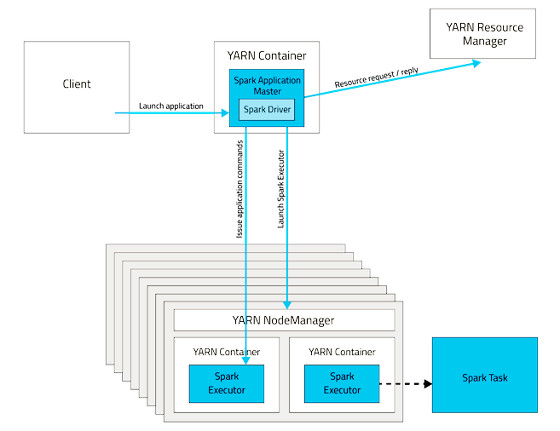
In Cluster mode, the Spark Driver is running within a container in YARN. So you can trust YARN to handle any failures. If the machine where the Driver is running goes down, it will be automatically restarted on another node.
Useful Configurations
spark.yarn.maxAppAttempts
The maximum number of attempts that will be made to submit the application should be no larger than the global number of max attempts in the YARN configuration.
spark.yarn.am.attemptFailuresValidityInterval
Defines the validity interval for AM failure tracking. If the AM has been running for at least the defined interval, the AM failure count will be reset. This feature is not enabled if it is not configured.
So if we were to set the above configurations to the values:
- spark.yarn.maxAppAttempts=2
- spark.yarn.am.attemptFailuresValidityInterval=1h
This would mean that every one hour, it will attempt to start the App two times.
Setting the Configurations
From the spark-submit Command:
$ spark-submit
--class "org.apache.testSimpleApp"
--master yarn
--deploy-mode cluster
--conf spark.yarn.maxAppAttempts=2
--conf spark.yarn.am.attemptFailuresValidityInterval=1h
/path/to/jar/simple-project_2.11-1.0.jar
In Code:
Gracefully Shutdown your Streaming Application
Now that we’re starting up the Application in the correct mode, we should discuss how to Shutdown the Big Data Spark Streaming Application in the event we want to roll out new features, make configuration changes, etc.
Currently, through YARN, you can shut down or kill a Spark Streaming Application with the following Command:
$ yarn application -kill {ApplicationID}
However, what if a Spark Streaming micro-batch is processing when you run this Command and kill the application?
The short answer is: the data you’re processing would be lost.
In addition, with how Spark pulls messages from Kafka (acknowledge to Kafka that it has received the messages before processing them) when you restart your Spark Streaming Application, it will skip those messages that were being processed and start processing the message that came in after.
To solve this, we need to implement a Graceful Shutdown process to ensure that the Spark Streaming Application will only shutdown between micro-batches, so we don’t lose any data.
Our first step to accomplish graceful shutdown with our starting point code above is:
// Start the computation
ssc.start()
ssc.awaitTermination()  <--- REMOVE THIS LINE
To Gracefully Shutdown the Spark Streaming Application, we’ll instead follow these steps:
- On Spark Streaming Startup: Create a touch file in HDFS
- Within the Spark Code: Periodically check if the touch file still exists - If the touch file doesn’t exist, start the Graceful Shutdown process
- To Stop: Delete the touch file and wait for the Graceful Shutdown process to complete
Tip: Build a shell script to do these start and stop operations
The Spark code that you would write would look something like this:
The first change is adding a global variable that indicates if we’re starting to shut the application down. Then replace the await Termination process with the while loop. Within the Loop, we’ll periodically check if the file in HDFS exists. If it does not, we’ll set the global variable to true and the logic within the while loops execute the stop command in the StreamingContext.
Monitor your Big Data Streaming Application
Like with any important application, you want to make sure that it’s running and that it’s running correctly. There are a few options for doing this with your Spark Streaming Application:
Operational Monitoring
See this page for more information: http://spark.apache.org/docs/latest/monitoring#metrics
StreamingListener (Spark ≥ 2.1)
Apache Spark 2.1 and greater has added functionality to provide Listeners that trigger events at various phases of the startup and execution of the Spark Streaming of Application. Here are some of the Listeners:
- onBatchSubmitted
- onBatchStarted
- onBatchCompleted
- onReceiverStarted
- onReceiverStopped
- onReceiverError
With the above Listeners, you can manually implement a process to push various metrics to whatever monitoring service your organization uses. We’ve used it in the past to push metrics about each micro-batch (Number of Messages Received, Time to Process, Various Errors, etc.) into a relational database that we later query to ensure the process is running and it’s running with acceptable performance.
Spark UI
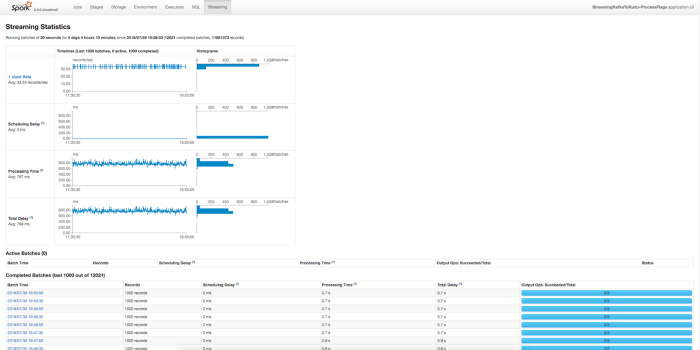
The Spark UI comes out of the box with Apache Spark and contains some very useful information. Above is just one of the views and perhaps the most important high-level view for Streaming. It provides information about each micro-batch. This includes how many records the micro-batch processed, how long it took, how much delay there was in starting up the micro-batch, and more. In general, this is a great way to confirm that your Spark Streaming Application is running and that it’s running with the correct performance.
Use Checkpointing
You may already be familiar with the standard form of Checkpointing used in Apache Sparks Batch offering. Where the data contained within an RDD or DataFrame is persisted to disk between the execution of the tasks contained within the RDD. This ensures that if there are any executor failures, Spark can restart from this Checkpoint rather than restarting the RDD or DataFrame from the beginning.
While this feature is still usable in Spark Streaming, there is another form of Checkpointing that is available for Spark Streaming Applications that may be useful:
Metadata Checkpointing
This involves saving the Metadata defining the streaming computation to fault-tolerant storage like HDFS. It is used to recover from the failure of the node running the driver of the Spark Streaming Application. Some of this Metadata includes:
- Configurations — The configuration that was used to create the streaming application.
- DStream operations — The set of DStream operations that define the streaming application.
- Incomplete batches — Batches whose jobs are queued but have not been completed yet.
This form of Checkpointing is also required if you want to perform any Stateful Transformations like updateStateByKey or reduceByKeyAndWindow.
You can Enable Checkpointing in your code by doing the following:
Problems with Metadata Checkpointing
Some things to watch out for when using Metadata Checkpointing are:
Checkpoints can’t survive Spark Version Upgrades
In the event you upgrade your Spark Version, you will need to delete your checkpoint manually.
Checkpoints need to be cleared between Code Upgrades
Since Metadata Checkpointing involves checkpointing the actual DStream operations that need to be performed on the records coming in, you will need to clear the checkpoint so the new operations from the Code Upgrade can be loaded. If you adjust your code to use slightly different operations and redeploy but fail to clear your checkpoint, the old operations would be loaded from the Checkpoint and your new changes would not be reflected.
Setup Multiple Partitions in your Kafka Topics
Assuming you’re using Kafka as the source of data for the Spark Streaming Application, it would help with performance to define multiple partitions when creating your Kafka topic. Let me explain how through the following diagrams.
When you’re running the command to create the Kafka topic, you can define the number of partitions with the highlighted option in the below command:
kafka-topics --zookeeper <host>:2181 --create --topic <topic-name> -
-partitions <number-of-partitions> --replication-factor <number-of-
replicas>
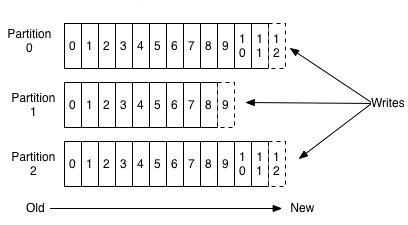
When data is pushed into a Kafka topic, the data is automatically distributed across the partitions by the Key you define in the Kafka Message. Each message is added to the Kafka topic with an offset associated with it or an ID that indicates its position in the partition. If you specify null as the Key, the message will be automatically distributed evenly across the partitions.
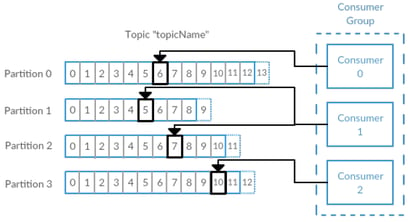
The above diagram shows how the Big Data Spark Streaming Application can work when processing messages from a Kafka topic with multiple partitions. Each “Consumer” can be thought of as one of the Spark Executors. Each Spark Executor can independently load data from a specific Kafka topic rather than a single source. In addition, each partition can also exist on a different Kafka Broker instance (separate node), which will help decrease the load on any one node.
Use Direct Streams with Kafka
If you’re using Kafka, then what’s useful to know is that there are two types of connectors: a Receiver based Stream and a Direct Stream. I’m sure if the title of this section didn’t give it away, you might ask, “Which one should I use?” and also possibly “What’s the difference?”. We’ll go over the difference here.
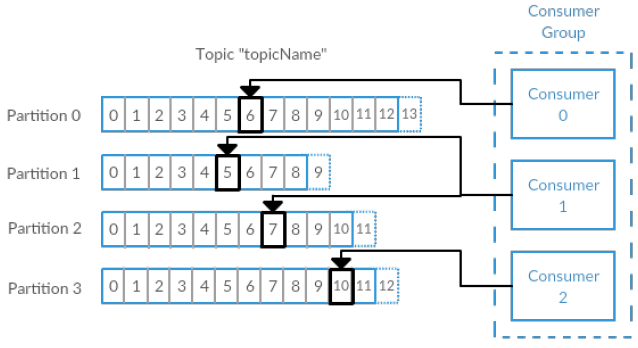
Receiver Based Streaming
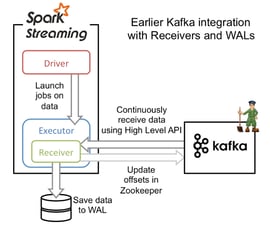
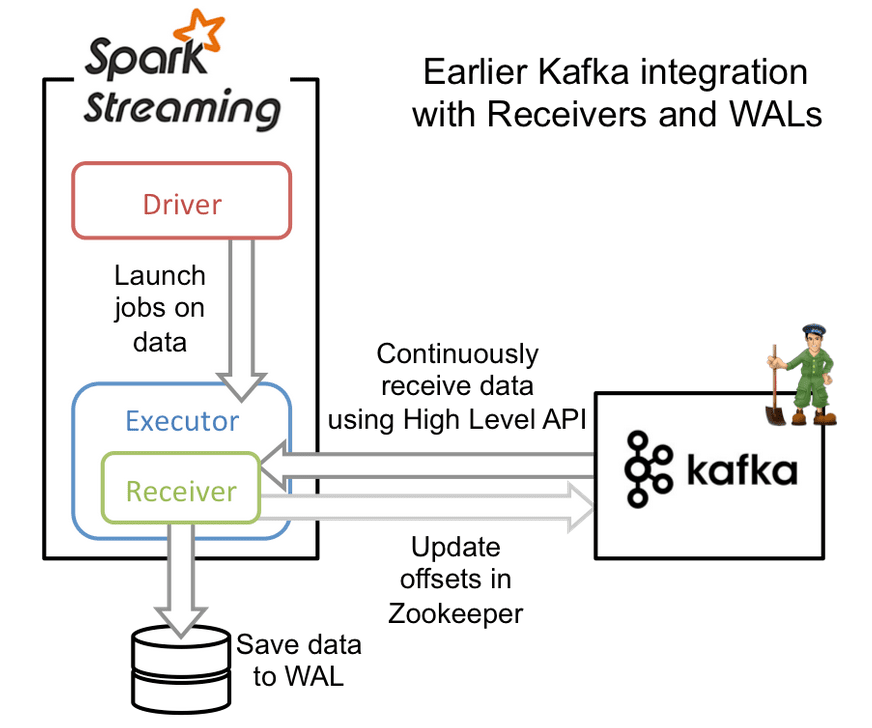
Receiver-based streaming is Spark Streaming’s standard implementation of how it receives data from any source (similar implementations for sources like Twitter, Kinesis, etc.). At the start of a micro-batch, the Driver launches a job for the Executor. Each Executor has a Receiver instance running inside of it. The Receiver process within each Executor is then triggered, which uses the Kafka High-Level API to load in the latest data from the Kafka Topic. The data from the Receiver is then stored in a Write Ahead Log (WAL). Before Kafka is updated, the data has been received (this prevents a loss of data). Once the data is safely in the WAL, the Spark Executors then work processing the messages.
How this strategy then prevents against failure is that if one of the Executors fails, then a new Executor is spawned to take its place. The Executor then loads the data the failed Executor loaded into the WAL.
Note: If you want to move forward using the Receiver based stream, you should do the following:
- Enable Checkpointing — This will allow Write Ahead Logs to be written to the Checkpoint Directory
- Enable the WAL — By default, the WAL is not enabled in Receiver based streaming. You can enable it by specifying the configuration: spark.streaming.receiver.wrteAheadLog.enable=true
- Set the proper StorageLevel for the WAL — Since data is already persisted to HDFS, you can disable in-memory replication to avoid duplicate storage: StorageLevel.MEMROY_AND_DISK_SER
This implementation was the first available in Spark Streaming and, of course, continues to work. So, why do we need another implementation?
Why then do we need a WAL? Well, here’s a thought: Kafka already stored replicated copies of the data in a circular buffer and is Highly Available. Including a WAL slightly decreases the performance since it needs to write the data to disk after receiving it from Kafka. Hence why the following option was introduced:
Direct Stream

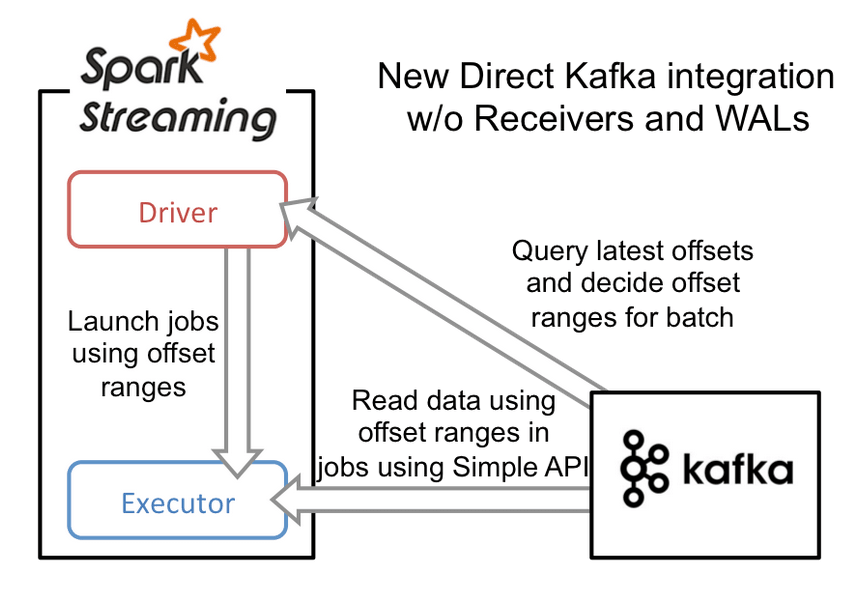
In a direct stream, we remove the WAL in favor of letting Kafka act as the WAL. The execution starts with the Driver launching jobs to the executors. The Driver also passes a range of offsets to each executor that it needs to process. For example, Executor 1 might be passed the offset range 2000–2050, and Executor 2 might be passed the offset range 2051–2100. Each Executor will load in its designated range of data and process it.
How this strategy then prevents against failure is that if one of the Executors fails, then a new Executor is spawned to take its place. The Driver will pass the same range to the new Executor as the previous one and retry processing that data.
Save your Kafka Offsets
Most organizations and subgroups we encounter have their hearts set on obtaining an Exactly-Once Delivery Semantic with Spark Streaming. The unfortunate thing is that it’s very difficult to do it in a distributed fault-tolerant system. It certainly doesn’t come out of the box with Spark Streaming (what you get is closer to either At-Least-Once or At-Most-Once Semantics). However, it is possible to do with Spark Streaming if you make some changes.
The main thing you need to do is Save the Kafka Offsets that were successfully processed after a micro-batch and load the last completed Kafka Offsets when you start up your Spark Streaming Application. The save operation would need to be done if the transaction on the incoming messages was completed successfully. To be more specific, you should store offsets after an idempotent output OR store offsets in an atomic transaction alongside output.
This all results in that only after the data has been transformed and saved to your output source, will you then move on from that data set. With the changes mentioned above using Direct Streams, you should then process all the data in a micro-batch in a fault-tolerant way and achieve the desired Exactly-Once Delivery Semantic.
The below diagram shows how your application can work to accomplish this.
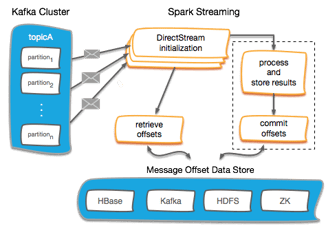
Below is a code example that shows how you can initialize your Kafka DStream by loading in offsets from the loadOffsets Command:
If assuming you’re using Kudu to store the offsets (hence the kuduContext), the overall procedure can work for any storage system for your offsets: Zookeeper, HBase, HDFS, Hive, Impala, etc.
Stabilize your Big Data Streaming Application
Before releasing your application into production, it’s a very good idea to take some time to do some performance testing. The main thing that you will need to ensure is:
Your Average Batch Processing Time should be less then your Batch Interval
So for instance, if you set your Batch Interval to 30 seconds, the average processing time for each micro-batch should be below 30 seconds.
Only one micro-batch is executed at any given point in time. So if your first micro-batch takes 40 seconds to run, there will be a delay before the second micro-batch triggers. If your micro-batches are consistently 40 seconds or so, then micro-batches will be scheduled faster than they will be completed. Eventually, after a couple of hours, you’ll have dozens of micro-batches that are waiting to trigger.
The danger with this is that micro-batches will continue to be scheduled which will fill up the Heap. Eventually, the Spark Streaming Application will fail.
You can see how much time your micro-batches are taking on the Spark UI. The bellow images show a job with its Batch Interval set to 10 seconds and the processing time occasionally spiking above 10 seconds, which shows a spike in Scheduling Delay.

If you do encounter a problem where your micro-batches are consistently longer then your Batch Interval, here are a few strategies you can employ:
Optimize your Operations (Transformations, Joins, and Writes)
It would really be worth it to review what operations you’re performing in your Spark Streaming Application. If you’re saving data to some external database that requires indexing, the save operation might be dramatically impacting your performance. In addition, you can also check how efficient your joins are and see if you can optimize which data set is on the right and left.
Implement Caching
If you’re processing the same source RDD/DataFrame multiple times, a big improvement might be to Cache the result of the RDD/DataFrame in memory.
Increase Parallelism
You could be running into a bottleneck situation with Kafka where you don’t have enough partitions. If you only have one partition defined in your topic or too few brokers, this could reduce the time to deliver the data to the Spark Executors.
It could also be that your Spark Streaming Application doesn’t have enough Executors to properly process all the data that’s coming in as efficiently as possible. Adding more Executors may help.
Repartition your Data
If you find that your data is unbalanced (all the data seems to be going to a single executor), you should go back to optimizing your operations and see if there’s a more efficient way to join another operation to ensure it’s balanced. Worst case scenario, though, you can Repartition your data to ensure it gets redistributed:
dstream.repartition(100)
Increase Batch Duration
If all else fails, you could try increasing your Batch Duration. Granted, this will increase the amount of data you’re processing, but you may be performing some operation that always requires 10 seconds or so to complete, no matter how much data you’re processing. If that’s the case, then increasing your Batch Duration might help.
Hope you found this post interesting and informative! Don’t forget to check out our Data Engineering solutions for all your business requirements.
Happy Streaming!!!