An introduction to Azure ML Designer to build a Churn Prediction Model
Azure Machine Learning Designer is a cloud service that allows building no-code machine learning models through a drag and drops visual interface. Clairvoyant has vast expertise in managing and architecting deployable ML models on the cloud. Backed by this experience, in this article, we will explore Azure ML Designer in detail by working on a classification task where the objective is to identify whether a customer is going to churn or not.
Setup
Azure machine learning service can be used by creating a workspace in your Azure subscription. Workspace is where we can manage the compute resources, store data and build pipelines for Machine learning models. Azure workspace can be created by signing into the Azure portal. Once the workspace is created, the Azure Machine Learning Studio can be accessed from there. First, the necessary compute targets like compute instances and compute clusters need to be created. You can find the setup instructions in detail here.
Process
The next step in Azure ML platform is to have the data stored in an object called a dataset by accessing the ‘datasets’ page in the studio. Now, we can proceed to build a pipeline for the classification model on the Designer page.
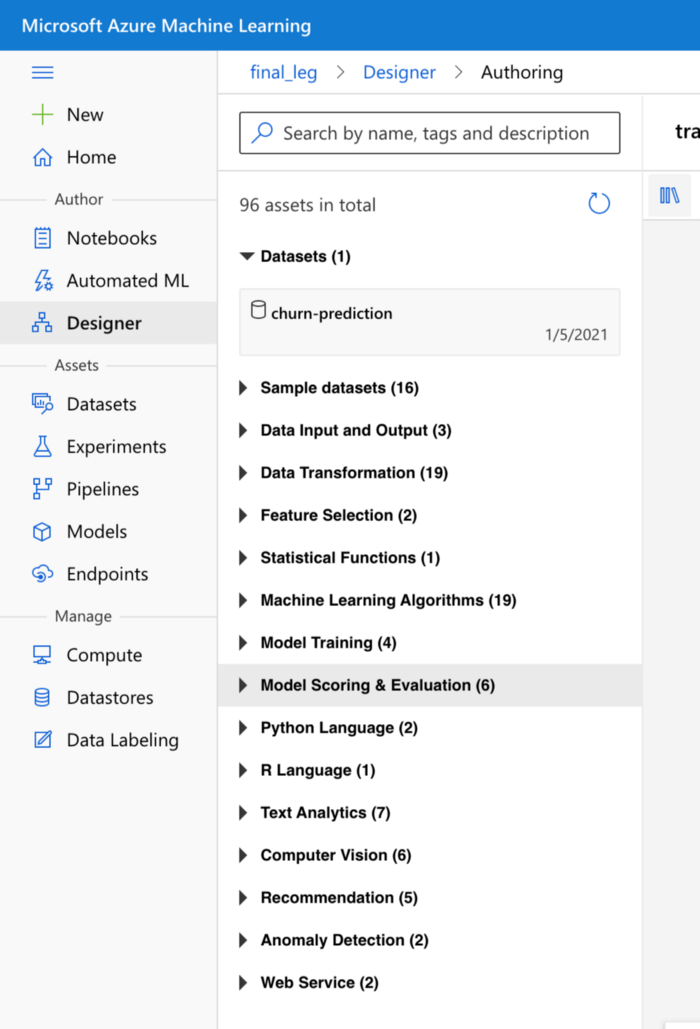
The pipeline needs to use compute cluster resources, so the relevant compute resource created earlier must be selected from the settings page before proceeding with the pipeline. So now, you can see various assets available under different sections to build the end-to-end pipeline. (see Fig 1.1 above)
Now, we can drag the Churn-prediction dataset object that we created earlier to the canvas on the right. Right-click on it to visualize the distribution of columns. Next, we can drag various assets under the Data Transformation section to perform the required transformations needed for our data. I had null values present under a column in the churn dataset, which allowed me to drag the clean missing data asset as seen below, connect it to the dataset module above, and select what I want to do with the missing values by clicking on the asset box. Likewise, the ‘Normalize Data’ asset can then be connected, and in its settings, min-max scaling can be selected.
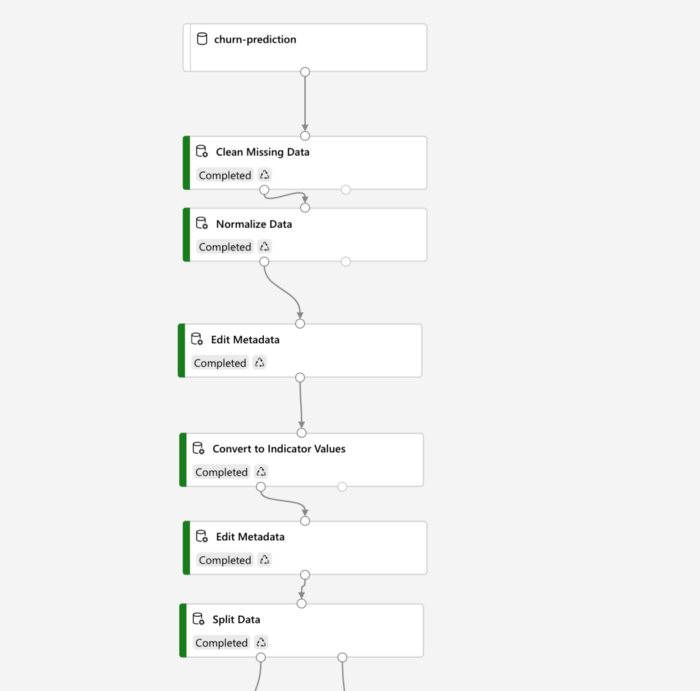
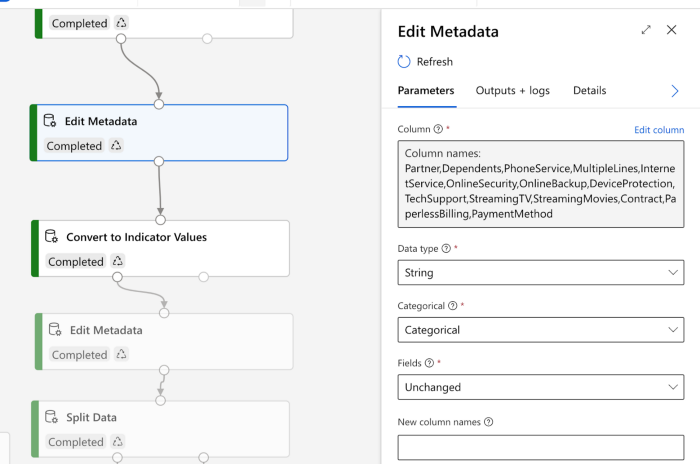
Then, in Azure Machine Learning Designer, columns with data type as strings need to be explicitly converted to categorical type before proceeding to one-hot encoding. We can use the ‘Edit Metadata’ asset to perform this task, as seen below. The column names which need the conversion from string to categorical have to be given here.
Next in the Azure ML platform, the ‘Convert to Indicator Values’ asset is dragged as the next connection, which performs one-hot encoding. Following it again is the ‘Edit Metadata’ asset, but the objective is to convert the target column, which is ‘churn’ in this case, by encoding ‘no’ and ‘yes’ classes to 0s and 1s. Under the fields section, ‘labels’ have to be selected to enable this on the settings page.
Once all the transformations are completed in machine learning Azure platform, the ‘Split Data’ asset can be dragged, and in its settings, the training data set size can be mentioned for the split. Now click on ‘Submit’ at the top, and the pipeline starts to run. It takes a few minutes to complete all the steps in the pipeline.
Modeling Steps
Now drag the ‘Train Model’ asset under the ‘Split Data’ asset. Here, the left end on the bottom side of the ‘Split Data’ asset must be joined to the right end at the top of the ‘Train Model’ asset. Adjacent to the ‘split data’ asset, drag another asset from the ‘Machine Learning algorithms’ section, which contains several algorithms. In this case, I’ve used a logistic regression model to perform the classification. Connect the left point on the ‘Train Model’ asset to the bottom part of the ‘logistic regression’ asset.
Now, the ‘Score Model’ asset is dragged from the ‘Model Scoring & Evaluation section’ and placed below the ‘Train Model’ in order to test the trained model on the validation dataset. The output of the ‘Train model’ is connected to the ‘score model’, and the right side output of split data, which has the validation dataset, is connected to the right side point of ‘Score Model’.
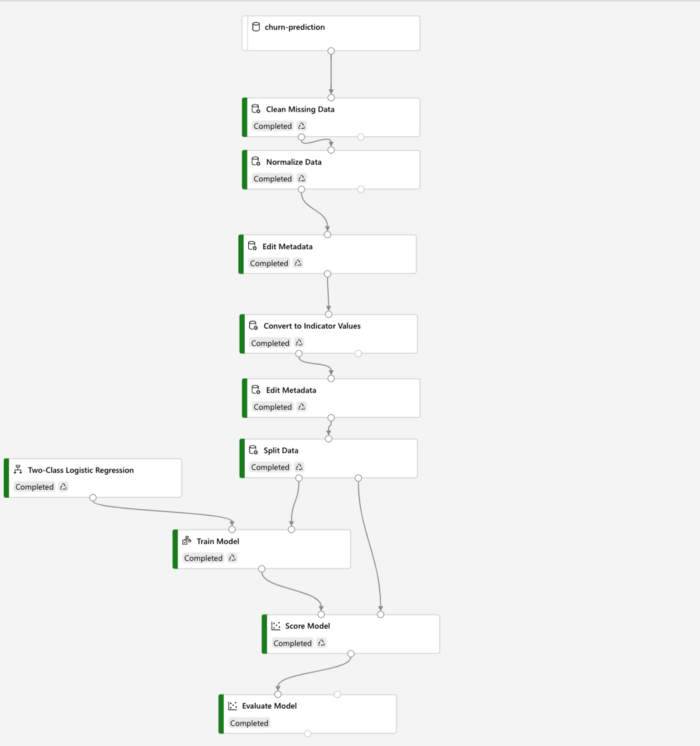
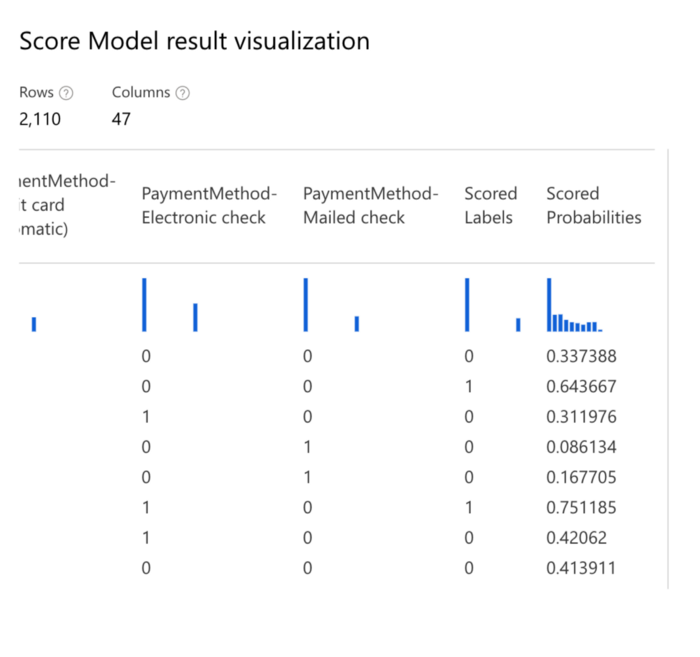
Now that the pipeline is ready click the ‘submit button to run the pipeline. It will run through all the new steps added in the pipeline. Once that is over, we can go to the settings page of the ‘Score Model’ asset to look at output logs where the class prediction and probability of positive class prediction are available towards the right side of the data.
Evaluation
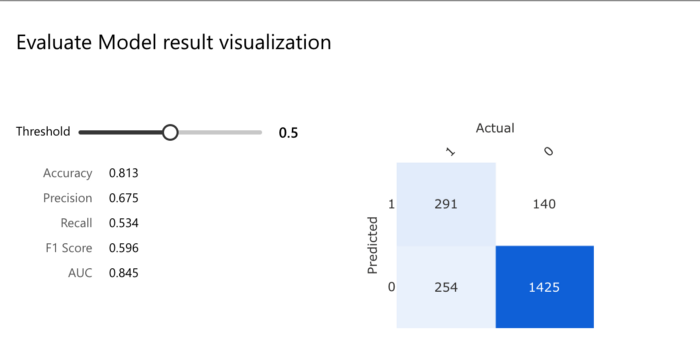
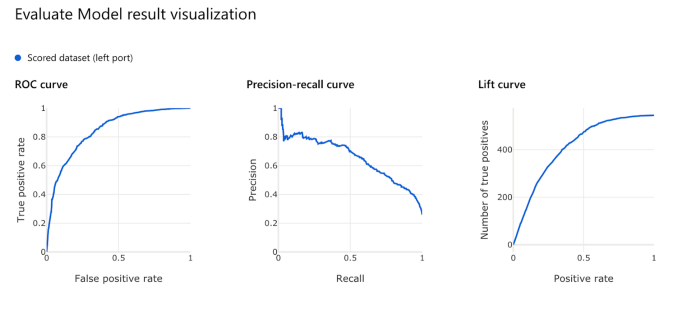
Since we now have the actual labels and scored labels for the validation dataset, the evaluation can be performed. Under the ‘Model Scoring & Evaluation section,’ drag an ‘Evaluate Model’ module under the ‘Score Model’ and connect them. Now if the pipeline is run again, we can visualize the model’s performance with respect to different evaluation metrics.
As mentioned below, for a threshold of 0.5, we have the following classification matrix and other accuracy metrics:
Finally, a real-time inference pipeline can be created based on this pipeline and deployed as a predictive service for the client application to use. The Azure Kubernetes cluster should be used as the inference cluster to handle scalability and security issues for production purposes.
Refer to this link for further information on this.
Conclusion
Azure ML designer helps to connect datasets and modules on an interactive canvas visually. One can create an end-to-end machine learning project by drag and drop methods. It is one of the many useful tools available within the Azure Machine Learning services. I hope you had a good overview of no-code machine learning with Azure machine learning platform. Learn more about our wide range of Artificial Intelligence services and fulfil your business needs with us!
Reference