Read more to learn how to set up Ubuntu servers using Virtualbox 6 on a Windows 10 operating system.
Our previous blog detailed the steps to install Ubuntu 18.04 LTS Server on VirtualBox.
Borrowing from Clairvoyant’s vast experience of working on Kafka, in this tutorial, I am going to set up Ubuntu servers using Virtualbox 6 on a Windows 10 operating system and also assign a static IP address to ubuntu virtual machines using netplan.
Also, I am going to show you how to set up a NAT-NETWORK and Host-Only Network. This setting will help us assign static IP to Ubuntu virtual machines to SSH [Secure shell] to those hosts, and VMs will have internet access.
A. Requirements
B. Change Your Host Name
C. Step to assign static IP to your Ubuntu VM.
D. NAT Networks
E. Using the Clone option to create another VM.
A. Requirements
Please refer to the below link to install the ubuntu server 18.04 LTS on virtual box 6 on windows 10. https://clairvoyant.atlassian.net/wiki/spaces/~898085804/blog/2020/05/08/1205698795
Required Software:
B. Change Your Host Name
As we are going to create multiple Ubuntu VMs or nodes, we need to assign a unique hostname for each node. Follow the below steps to change the hostname permanently in Ubuntu 18.04 server VM and to keep the changes intact after reboot:
-
Go to /etc/cloud/cloud.cfg — -> check the line preserve_hostname — -> Change the setting to True from False.
-
Run the command:
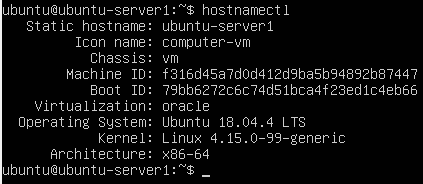
$ sudo hostnamectl set-hostname your-desired-hostname
The above command will change your hostname and we will need this when you create another node.
-
Run hostnamectl to see the changes as below:
C. Step to assign static IP to your Ubuntu VM.
I am going to use the Host-Only Network to assign static IP to VM. It will help us to ssh to your VM from the Windows 10 machine [Operating system of your computer to VM and vice-versa ] using Putty.
Step- 1 How to create A Host-Only Network
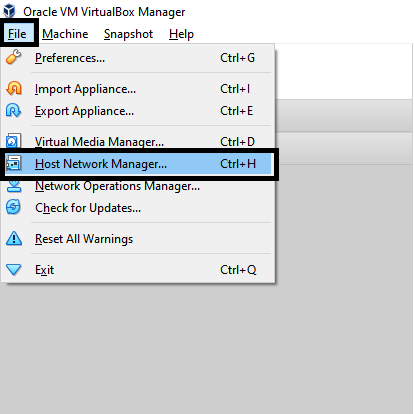
1.1 Open Virtual Box
1.2 Click on File
1.3 Click Host Network Manager from the File Menu
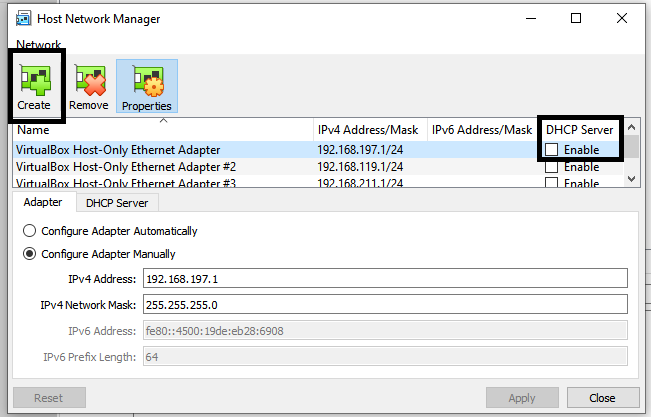
1.4 Create the network as per your preference. To assign a static private IP address to this machine, disable the DHCP server. [Untick the DHCP server option in the Host Network manager]
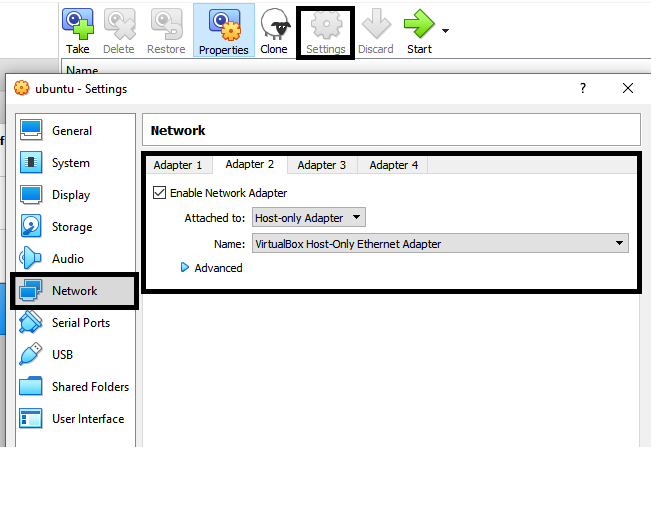
1.5 Set the VirtualBox Host-Only Ethernet Adapter to your Ubuntu VM Box. Go to your VM settings by selecting your VM, and then click on Setting. In the Network tab, set the following:
Attached To = Host-only Adapter
Name = VirtualBox Host-Only Ethernet Adapter
Step- 2 Configure your machine to use the static IP for SSH
2.1 Start your VM and enter your username and password to log in
2.2 We are going to use Netplan for assigning the static IP. Netplan is a utility for easily configuring networking on a Linux system
2.3 Go to path — -> /etc/netplan — -> Edit the 50-cloud-init.yaml file — -> Add below setting in yaml file — -> Save the file
 network:
  version: 2
  renderer: networkd
  ethernets:
    enp0s8:
      dhcp4: no
      addresses: [192.168.197.101/24]
      gateway4: 192.168.1.1
      nameservers:
        addresses: [192.168.1.1, 8.8.8.8]
2.4 Rename the 50-cloud-init.yaml as per your preference
2.5 Apply the changes
$ sudo netplan generate
$ sudo netplan apply
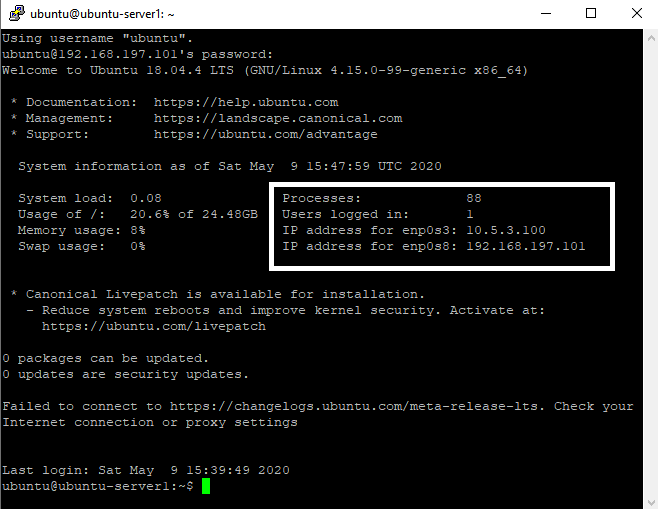
2.5 See the changes using command ifconfig or ip a
Step- 3 Use putty to SSH Into Your VM
In your host machine(your laptop/PC), open a Putty and add the below in the hostname section. Once done, enter your username and password to login to your VM.
See your VM IP address in the lower right part of your console.
ubuntu@192.168.56.100
D. NAT Networks
How does it work?
Netplan reads the network configuration from /etc/netplan/*.yaml, which are written by the administrators, installers, cloud image instantiations, or other OS deployments. During the early boot, Netplan generates backend-specific configuration files in /run to hand off control of devices to a particular networking daemon. Read more about it on the below link:
To give our ubuntu server VMs access to the internet, we are going to use the NAT Networks feature in Virtualbox and create such a network.
Note: As we cannot edit VM networks while your machine is running, power off your VM, and follow the below steps:
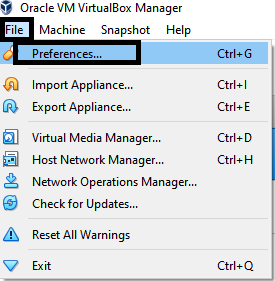
Step- 1 How to create a NAT Network
1.1 Open up virtual box
1.2 Click on File — -> Preferences → Network -> create a new NAT network
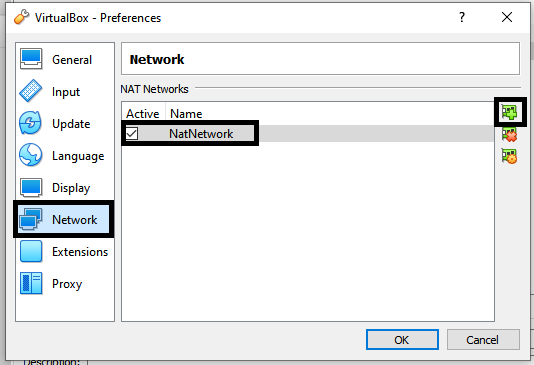
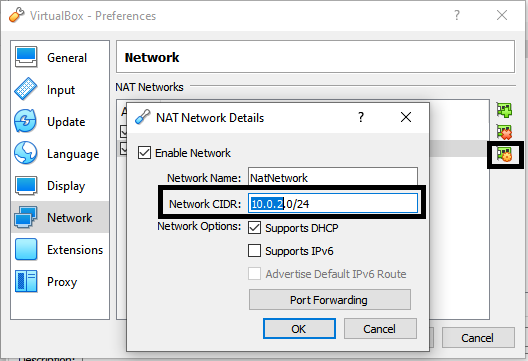
1.3 Open your created NatNetwork and configure your NAT network as per your preference
1.4 Set the VirtualBox NatNetwork to your Ubuntu VM Box. Go to your VM settings by selecting your VM and then click on Setting. In the Network tab, set the following:
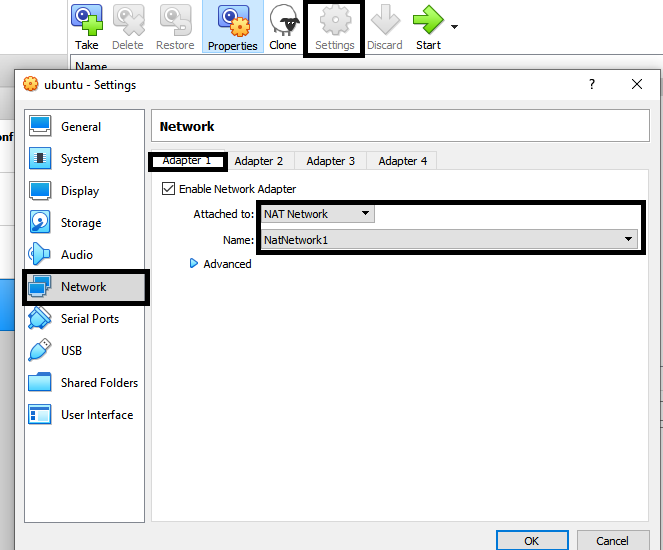
Step- 2 Configure your machine to use the static IP for Internet Access
2.1 Start your VM and enter your username and password to log in.
2.2 Go to path — -> /etc/netplan — ->Create new .yaml file[vi ] — -> Add below setting in yaml file — -> Save the file
  network:
  version: 2
  renderer: networkd
  ethernets:
    enp0s3:
      dhcp4: no
      addresses: [10.0.2.101/24] #10.0.2.101: This your static ip
      address for your NATNetwork
      gateway4: 10.0.2.1
      nameservers:
        addresses: [8.8.8.8]
2.3 Apply the changes
$ sudo netplan generate
$ sudo netplan apply
2.4 See the changes using command ifconfig or ip a
2.5 To check if your machine has access to the internet:
$ ping 8.8.8.8 or ping google.com or sudo apt-get install tree
Note: As we cannot clone VM while your machine is running, power off your VM, and follow the below steps:
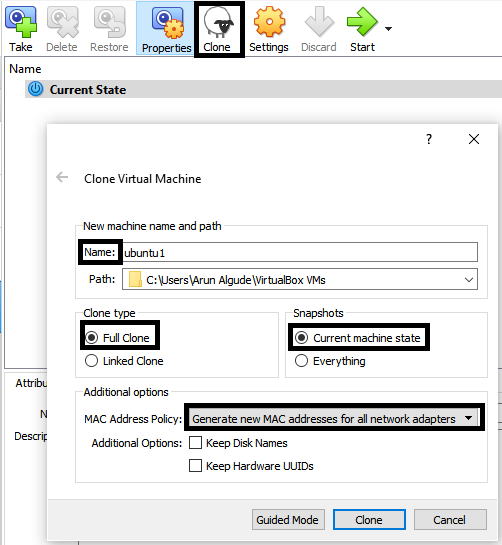
E. Using the Clone option to create another VM
1.1 Open VirtualBox
1.2 Select you Ubuntu Server VM
1.3 Click on Clone option — -> Click on Expert Mode — -> Name your Clone — -> select Path — -> Clone type [Full Clone] — -> Snapshots [Current Machine state] — -> MAC Address Policy [Generate new MAC addresses for all Network Adapters] — -> Click on Clone.
1.4 Start your cloned VM. Do not ssh to your Cloned VM
1.5 Follow the Steps from Section B to D again
1.6 Ping the cloned VM from another Ubuntu VM and check if the hosts are able to see each other


1.7 Configure each host to use hostnames by editing /etc/hosts
Check out the third blog of the Kafka Series in continuation of this blog. For the best data engineering solutions for your business, reach out to us at Clairvoyant.