Cloudera is one of Hadoop’s chief distributions. It provides an easy-to-install Virtual Machine that gets you quickly started on their platform. This allows anybody to get a single node CDH cluster running easily within a Virtual Environment. Users could use this VM for their own personal learning, rapidly building applications on a dedicated cluster, or for many other purposes.
Apache Nifi is an easy-to-use, powerful, and reliable system. It is used to process and distribute data, supporting powerful and scalable directed graphs of data routing, transformation, and system mediation logic.
Pre-Installation Steps
-
You will need to install Java 8 on the Virtual Machine for Nifi to be supported. You can follow these instructions for the same: Upgrading to Java8 on the Cloudera Quickstart VM.
Installation Steps
1. Download and Install the VM
-
Navigate to https://www.cloudera.com/downloads/quickstart_vms.html
-
Select the Platform you’d like the VM to run on and Download
-
Load the VM into your desired Platform
2. Configure the VM
Before starting the VM, set up the following configurations:
— Set at least 8GB of RAM
— Set at least 2 CPUs
3. Startup the VM
4. Download Cloudera DataFlow (CDF)
-
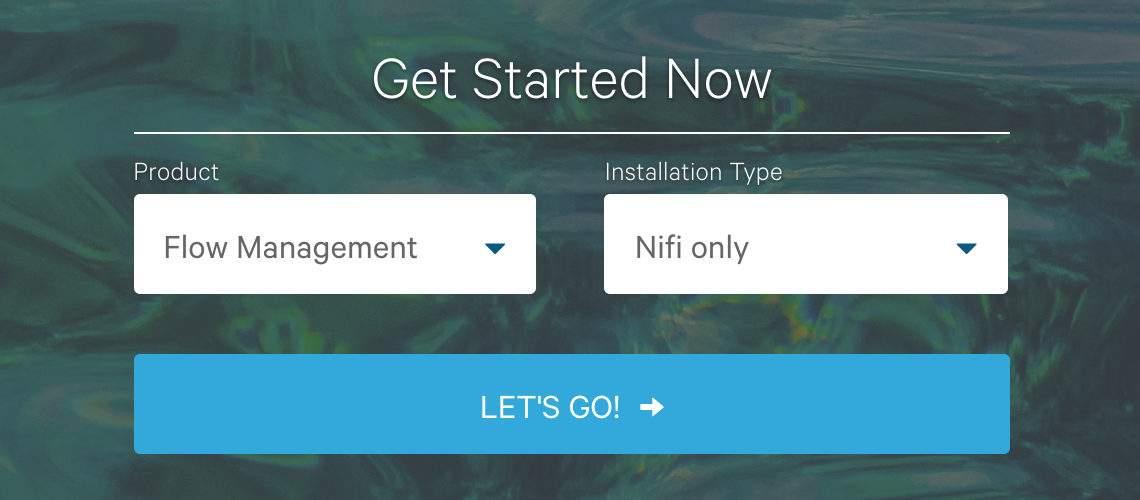
Download the TAR file for the following configuration on the VM, preferably in the /opt/ directory:
— Product: Flow Management, Installation Type: Nifi Only
Cloudera DataFlow Configuration
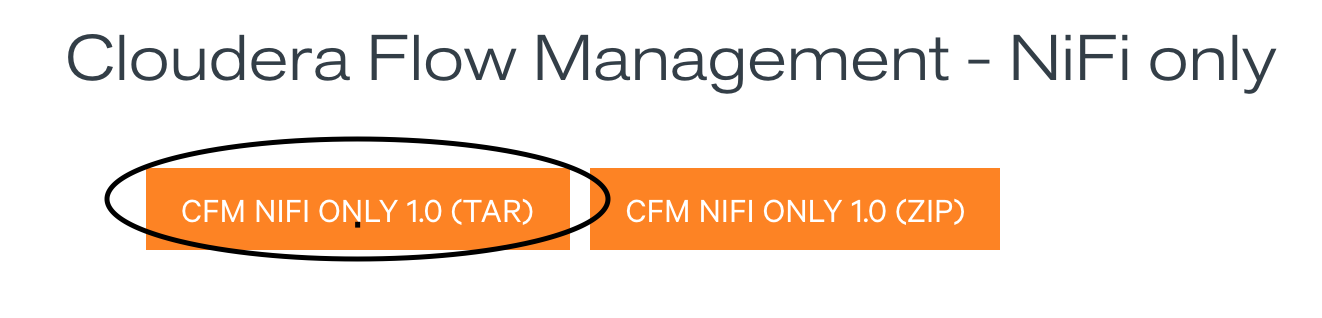 Cloudera DataFlow Configuration
Note: The QuickStart VM was built on RHEL 6, so it would not use the Centos7 Parcel and the CDS to install Apache Nifi and monitor it through the Cloudera Manager.
5. Nifi Installation
-
Navigate to the directory with the TAR file (/opt/) and “Untar” it
tar -zxvf nifi-1.9.0.1.0.0.0-90-bin.tar.gz
-
Create a symlink for easier access to the nifi directory
ln -s /opt/nifi-1.9.0.1.0.0.0-90 /opt/nifi
6. Nifi Configuration
-
Edit ~/.bash_profile to set the correct path for Java 8
JAVA_HOME=/usr/java/java8
export JAVA_HOME
-
Since many services run on port 8080, the host for Nifi can be changed by editing the conf/nifi.properties file and changing the following value to avoid potential conflicts with other applications:
nifi.web.http.port=8080
7. Accessing Nifi
-
Navigate to the directory where Nifi was installed (/opt/nifi)
-
Execute the following command to start Nifi in the background:
bin/nifi.sh start
-
Other important commands:
# Starts Nifi in the foreground
bin/nifi.sh run

# Checks whether Nifi is currently running
bin/nifi.sh status

# Shutdown Nifi
bin/nifi.sh stop
-
Open a web browser and navigate to http://localhost:8080/nifi , to interact with the web User Interface for Nifi.
Smoke Test
The smoke test consists of two parts responsible for the test's execution and the clean-up, respectively.
Prerequisites
-
Note: The script utilizes Python. Ensure that sys, json, and urllib packages are installed.
Configuration
-
Update the following variables at the head of the code for both files to reflect the correct values:
NIFI_HOST="localhost:8080"
HADOOP_CORE_SITE_PATH="/etc/hadoop/conf/core-site.xml"
HADOOP_HDFS_SITE_PATH="/etc/hadoop/conf/hdfs-site.xml"
TEMP_HDFS_DIRECTORY="/tmp/nifiTest"
Part I
-
GitHub Link: URL
-
Responsible for setup and execution. It creates a new process group, uploads a pre-created template to Nifi, which creates flow files, and saves them to a directory in HDFS. The process executes for five seconds and then stops, listing the contents of the HDFS directory. Check to see if flow files are present in the directory. The output should be similar to the image shown below:
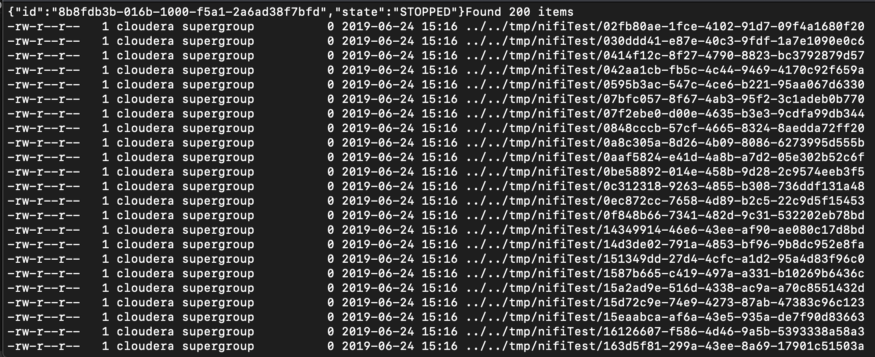 Generated flow files present in /tmp/nifiTest
Part II
-
GitHub Link: URL
-
Responsible for the clean-up. It deletes the contents of the queue in the process group, the SmokeTest template, the process group itself, and finally, the contents in the HDFS directory.
References
-
Official Nifi Docs: URL
Conclusion
All set! Apache Nifi is up and running.
Special thanks to Robert Sanders for permitting the use of his iconic Installation Guide template.
Learn how to write custom partitioner for Apache Kafka in our blog here. To get the best data engineering solutions for your business, reach out to us at Clairvoyant.