An IoT Solution for Enterprise Manufacturing with Red Hat, Eurotech and Cloudera Services
The “Internet of Things” is an incredibly useful concept. By simply acquiring real-time telemetry from assets (trucks, machines, etc.) within your organization, you’ve empowered your company to start making informed decisions on how it can improve its processes.Even something as simple as tracking if your office building lights are on can tell you volumes about your organization: how much energy you are potentially wasting, when your workers usually come in, etc.
Take a recent implementation that we at Clairvoyant built in collaboration with Red Hat, Eurotech, and Cloudera. We were able to pool together all our knowledge and expertise and implement an IoT solution. In this post, I’ll describe what technologies we used and our overall architecture for the solution.
As a little bit of a preview, here is a list of all the technologies we used in the solution:
-
Everyware Software Framework (ESF)— aka. An Enterprise version of Eclipse Kura
-
Everyware Cloud (EC) — aka. An Enterprise version of Eclipse Kapua
Now, let’s go into the Architecture and how the above technologies all fit together.
 Data Pipeline Technologies
Machines -> IoT Gateways
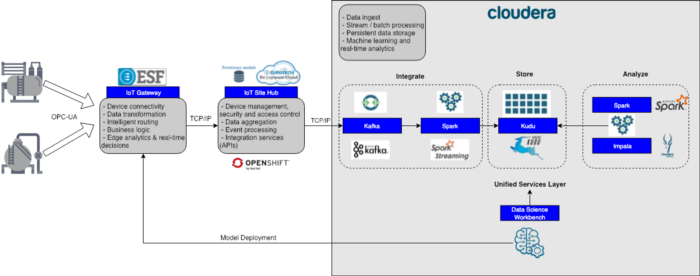
First, we have the manufacturing machines on the left, sitting inside one of the many clients' factories. A similar setup exists in all the other factories as well. These machines have an application running them to control all the various functions of the machine and capture metrics about each cycle. Our first step was to modify this application to take the captured metrics and serve this data up to an OPC-UA server which was installed on the machine’s OS.
Once this change was done, we obtained an IoT Edge Device running Everyware Software Framework (ESF) and established connectivity to capture these metrics from the OPC-UA server. In the early days of the project, we were just using a Raspberry Pi as our IoT Edge Device. Later, when it came to time for the production, we worked with Eurotech to obtain a certified device that we knew could handle the expected load.
IoT Gateways -> IoT Data Hub
Our next step was to set up a Central IoT Data Hub that would aggregate data from all the common machines across all the factories. For this, we used Everyware Cloud (EC), running on top of Red Hat OpenShift, which provides seamless integration with the ESF instances on the factory floor. These services (OpenShift and EC) were all installed in an Azure Cloud environment so all factories could push data to the same source. Once these services were installed, it was as simple as going to the ESF Web Consoles and establishing a connection to EC. The data would then instantly start to stream in.
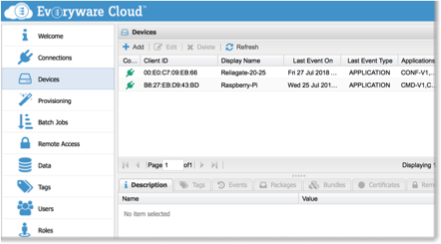
 A view of some devices connected to the EC
Under the covers, MQTT is used to transfer data from ESF to EC, as both the ESF and EC services have embedded MQTT brokers. The interface that’s available in ESF provides you the ability to forward the messages in the ESF broker to any EC you choose.
Note: The data in the MQTT brokers are represented in Protobuf format by default. You can change this to JSON if you’d like, but there are certain advantages to using Protobuf:
-
Messages in Protobuf format are smaller than if it's represented in JSON
-
Data can be easily compressed (gzip)
-
Data is then searchable through the Elastic Search instance that comes with EC
IoT Data Hub -> Storage and Processing Layer
The next step involves getting the data into a platform where we can reliably store the data and our team can run analytics on it. For this, we built a Hadoop cluster, to store the data and allow us to process it with a variety of tools. A Cloudera distribution of the cluster was built since it provided some useful tools for data processing and analytics. These tools will be described later.
To get the data from the IoT Data Hub into Hadoop, we used a feature that was built into the EC framework: you can configure an Apache Camel instance to forward messages from the internal MQTT broker into Apache Kafka (internally it uses the camel-mqtt and camel-kafka components). We set up multiple routes to forward messages from one MQTT Topic to a corresponding Kafka Topic. Below is how we named the topics:
 MQTT to Kafka Topic Naming Strategy
-
Account_Name —The account in EC where the data is being forwarded to. In our case, we set up one account for each factory location to help segment the data
-
Application_Name — Used to identify the Machine type (i.e. Welder, Drill, Lift, etc.)
-
Topic — The type of data we’re retrieving from the machine (i.e. RPMs, Pushers, etc.)
For Example:
MQTT Topic Name: USA/00:E1:E3:C9:EB:77/Drill/RPMs
Account_Name (aka. Factory Location): USA
Application_Name (aka. Machine Type): Drill
Topic (aka. Data Type): RPMs
Corresponding Kafka Topic Name: USA-Drill-RPMs
Once the data landed in the necessary Kafka topic, we set up an Apache Spark Streaming job to read from each topic, deserialize the data from the Protobuf format and save that data to a corresponding table in Apache Kudu. Kudu, with its Column Oriented table design, was used to enable the client to look up data more rapidly for their analytics. However we could have just as easily been saved into Hive, HBase or any other storage if you so chose.
Machine Learning and Data Analysis
After the data was stored, we could then start to use the plethora of tools that were available to us on the Cloudera cluster.
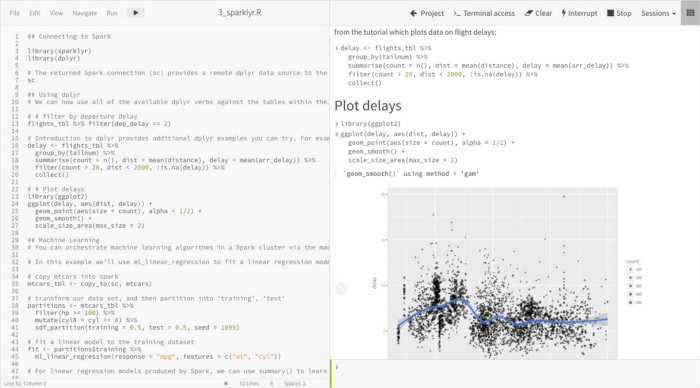
One of the primary tools we installed for the client, was the Cloudera Data Science Workbench. This tool enabled the client to easily start up an Apache Spark Session and explore the data. Through a notebook-style Web Application you could choose what language you’d like to develop your Spark Applications in (Python, R, and Scala) and fine-tune the number of resources you’d like allocated to Spark.
 Cloudera Data Science Workbench View — Self-service data science — link
One of the main uses of the Cloudera Data Science Workbench was to allow users to explore the datasets and run Machine Learning algorithms. Right out of the box with Apache Spark, you get all the capabilities that come with the MLib library. This includes DataFrame capabilities and a wide range of Classification, Regression, and Clustering Algorithms.
If Spark alone isn’t enough for your use case, there are already some other pre-installed packages in the available sessions. A complete list can be found here: link. You can also easily install various python packages to provide more functionality to your notebooks. Many clients have made use of this feature to install various packages like PyTorch.