How our team went about dealing, diagnosing, and fixing an issue with an AWS EC2 Instances Boot Up
Background
After shutting it down, we recently had a problem with one of our AWS EC2 Instances, making some configuration changes and starting it back up. We were unable to SSH onto the machines despite the machine coming up OK (we would keep getting a Connection Refused error). We reviewed the Security Group settings, Network Settings, reverted our configuration changes, made sure we were pointing to the correct IP address, and much more. However, we still couldn’t SSH onto the machine.
Upon viewing the system logs, we noticed that one of the disk volumes failed to be mounted onto the machine. After restarting it under a different device name, an Instance Store drive was remounted onto the machine. This prevented the boot up from completing, which prevented the sshd daemon from being started up to allow us to SSH onto the machine. With us not being able to SSH onto the machine to effect repairs we were left dead in the water. But we eventually figured out a way to view the file system and make the necessary changes to fix the issue, which is described in this blog post.
In our case, it was an issue with the /etc/fstab that caused us to follow these steps, but there are other cases where these steps can also benefit you. For example, if you mistakingly configured sshd not to start on startup of the machine or if something else failed to run during bootup which prevented the sshd daemon from starting up.
High Level Process
To resolve this, we’re going to basically unmount the bad machine's root file system, mount it to a healthy machine so we can explore the file system and fix the issue, and then remount it back to the original instance.
Step by Step Process
Setup
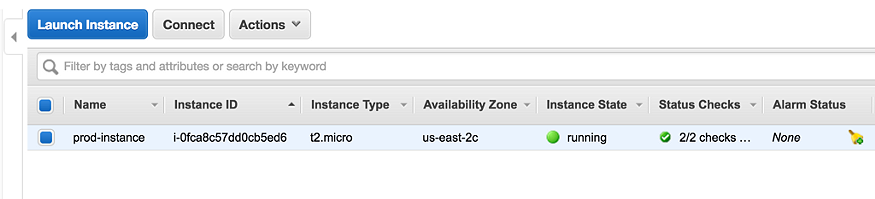
Suppose we have our EC2 instance (call it prod-instance), which has booted up OK, but we cannot SSH onto it.
Steps
1. Loin to the AWS Web Console
2. Stop the prod-instance instance
3. Detach the root EBS volume from the prod-instance
-
1. Select the prod-instance EC2 instance in the AWS console and view the content in the “Description” tab in the window bellow the instance list
-
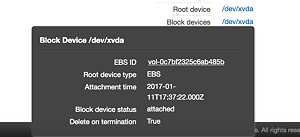
2. Search for the “Root device” field
-
3. Click on the link next to it
-
— It should look something like this: /dev/xvda
-
— A dialog box will pop up
-
4. Take a note of the EBS ID
-
— For the steps below, assume the EBS ID is vol-0c7bf2325c6ab485b
-
5. Click on the EBS ID link
-
— This will take you to a new list with information on that EBS Volume

-
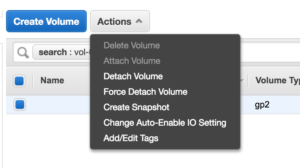
6. Make sure the EBS Volume vol-0c7bf2325c6ab485b is selected and click Actions -> Detach Volume

-
7. If you would like to abort this and reattach the volume, Jump to step #15
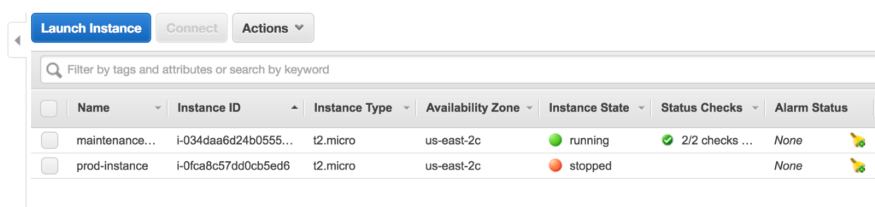
4. Create a brand new micro instance that you’re able to SSH into and let it startup. We’ll call it maintenance-instance.
-
Make sure that its in the same Region and Availability Zone of the machine you detached the root volume from. Volumes cannot switch between availability zones.
-
Note: Be sure you can SSH onto the machine before proceeding forward
ssh -i {pem_file} {username}@{ec2_host_or_ip}
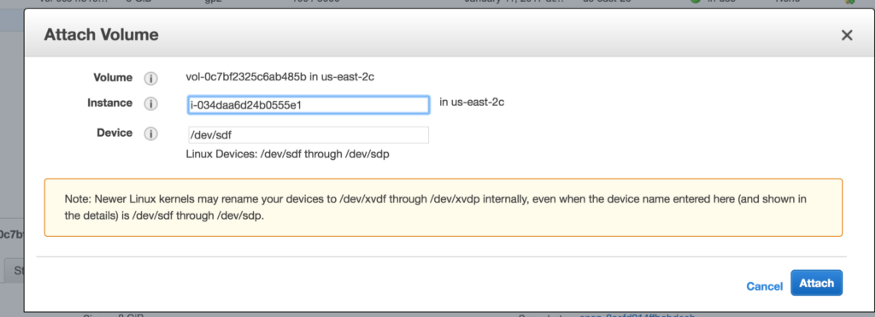
5. Mount the prod-instance’s old root EBS volume to the maintenance-instance as an additional drive
-
1. Click on the “Volumes” link on the left side of the AWS EC2 Web Console under ELASTIC BLOCK STORE
-
2. Search for the EBS Volume you detached (vol-0c7bf2325c6ab485b). It will also be listed as having the State “available” (as opposed to “in-use”).

-
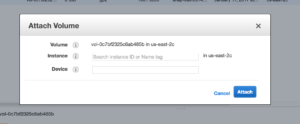
3. Select the volume and click Actions -> Attach Volume

-
4. This will open a modal

-
5. Search for your the maintenance-instance and click on the entry
-
— By clicking on the entry it will put in a default value into the Device field. If it doesn’t, you can put in the value /dev/sdf.
-
6. Click Attach
-
7. Note: You do not need to stop or restart maintenance-instance before or after attaching the instance.
6. SSH onto the maintenance-instance
7. Login as root
sudo su
8. Check the disk to ensure that the prod-instance’s old root EBS volume is available and get the device name
-
1. Run the following command to get information about what volumes are currently mounted (which should only be the default root volume at this point)
df -h
-
This will produce a result like this:
Filesystem Size Used Avail Use% Mounted on
devtmpfs 488M 64K 488M 1% /dev
tmpfs 498M 0 498M 0% /dev/shm
/dev/xvda1 7.8G 981M 6.7G 13% /
-
What this tells you is that there is one main drive called /dev/xvda1 which is the root volume of the maintenance-instance. Thus we can ignore this device name.
-
2. Run the following command to find out what the device name is of the volume we want to effect repairs on
lsblk
-
This will produce a result like this:
NAME MAJ:MIN RM SIZE RO TYPE MOUNTPOINT
xvda 202:0 0 8G 0 disk
└─xvda1 202:1 0 8G 0 part /
xvdf 202:80 0 8G 0 disk
└─xvdf1 202:81 0 8G 0 part
-
What this tells you, is that there are 2 main disks attached, each with one partition. We’ve already found out that the xvda device is the original root volume of the maintenance-instance, so by process of elimination xvdf is the disk we mounted onto the machine and want to effect repairs on.
-
3. Get the device name of the volume you mounted onto the machine
-
— In our case, based off the output above, the device name is: /dev/xvdf1(which is the partition of that disk)
-
— Note: you may have noticed the device name also available in the AWS console under the Description of the machine and under the Block devices section. However, the value provided in the AWS console isn’t always the same as the one you will see when using the fdisk or lsblk command, so therefore you shouldn’t use this value. Use the one provided in the fdisk or lsblk command.
9. Create the directory that you want to mount the volume to (this can be named and placed wherever you would like)
mkdir /badvolume
10. Mount the drives partition to the directory
mount /dev/xvdf1 /badvolume
11. Explore the file system and make the necessary change you would like to it
-
Change directory to the newly mounted file system
cd /badvolume
-
Note: Since we were dealing with a mounting issue, we had to modify the /etc/fstab file to prevent the machine from trying to mount the volume that was failing. Since theprod-instance’s root volume was mounted onto the /badvolume directory, the fstab file that we need to fix is at /badvolume/etc/fstab.
-
— We simply commented out the bad entry and then moved on
-
When you have completed your repairs, move onto the next step
12. Unmount the drive from the machine
umount /badvolume
13. Switch back to the AWS Web Console
14. Detach the vol-0c7bf2325c6ab485b volume from the maintenance-instance
-
1. Click on the “Volumes” link on the left side of the AWS Web Console under ELASTIC BLOCK STORE
-
2. Search for the EBS Volume you detached (vol-0c7bf2325c6ab485b). It will also be listed as having the State “in-use”.
-
3. Select the volume and click Actions -> Detach Volume
15. Re-Attach the vol-0c7bf2325c6ab485b volume to the prod-instance as the root volume
-
1. Click on the “Volumes” link on the left side of the AWS Web Console under ELASTIC BLOCK STORE
-
2. Search for the EBS Volume you detached (vol-0c7bf2325c6ab485b). It will also be listed as having the State “available”.
-
3. Select the volume and click Actions -> Attach Volume

-
4. This will open a modal
-
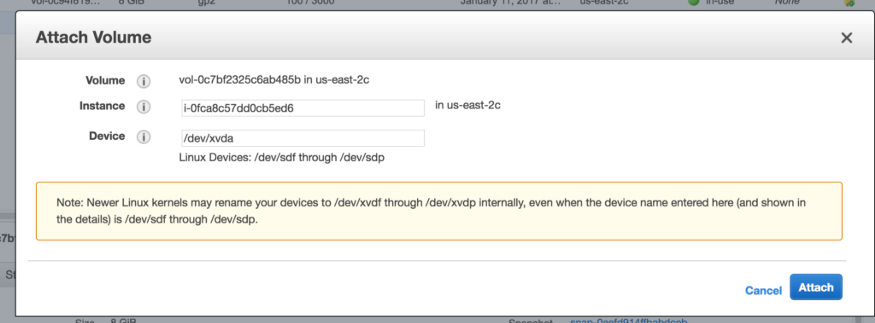
5. Search for your the prod-instance
-
6. Set the Device as the root volume with the value: /dev/xvda
-
7. Click Attach
16. Restart the prod-instance
17. Test SSH’ing onto the prod-instance
18. If you’re still having issues connecting to the prod-instance then check the system logs of the machine to debug the problem and, if necessary, repeat these steps to fix the issue with the drive.
19. When you’re all done you can terminate the maintenance-instance
To learn about the AWS security services, head to this blog. For all your cloud based services needs, contact us at Clairvoyant.