Read about how we can use AWS to deploy the docker images
Nowadays, everyone’s leaning towards the cloud. Everybody wants services and applications to be hosted on a cloud platform to save a lot of costs for on-prem servers, feasibility, security, availability, scalability, etc. Different cloud computing service providers like Amazon, Google, Heroku, etc. But, in this blog, we will focus on Amazon Web Services (AWS).
AWS is the most comprehensive and continuously evolving cloud computing platform provided by Amazon. AWS offers a combination of Platform-as-a-service (PaaS), Infrastructure-as-a-service (IaaS), and Software-as-a-service (SaaS).
AWS provides a vast range of services/tools, such as:
-
Container — ECS, EKS
-
Compute — EC2, Lambda
-
Database — RDS, DynamoDB
-
Storage — S3, EBS, EFS,
and many more.
AWS provides a Free Tier to its newly registered customers for one year from the date of account creation. This provides customers the ability to explore and try out different AWS services free of charge up to the specified limits. You can find more details can be found on the AWS Free Tier.
Based on my experience and learning, I have penned down, in this blog, these steps for anyone looking to deploy docker images/containers on AWS ECS.
What Is AWS ECS?
Amazon Elastic Container Service (Amazon ECS) is a container orchestration/management service similar to Kubernetes, Docker Swarm, etc. It allows applications/containers to run on top of EC2 hosts. It’s a highly scalable and high-performance service that comes with Docker pre-installed.
Benefits that make customers choose AWS ECS:
-
Focus on building and managing applications instead of infrastructure with Capacity Providers
-
More secure
-
Reliable
-
Option to go serverless with Fargate
-
Highly scalable
-
Optimized for cost
Following are the different terminologies in ECS that we’ll go through one by one in the following sections:
-
Cluster
-
Task Definition
-
Task
-
Container Instance
-
Service
What Is Docker?
Docker is an open platform that simplifies developing, building, managing, and running applications in an isolated environment called a container. It provides us the ability to manage our infrastructure in the same ways that we manage our applications. We can reduce the delay between writing the code and running it by taking advantage of its shipping, testing, and deploying the code quickly.
We can use Docker for:
-
Enabling consistent and faster delivery of your applications
-
Enabling responsive deployment and scaling
-
Running more workloads on the same hardware.
Prerequisites
-
Make sure the docker is installed
-
Make sure the AWS CLI is installed and configured
-
Ensure you have a basic understanding of Docker and AWS-like commands. AWS EC2, Security groups, etc.
-
Ensure that your application is created using/updated to the latest version of SpringBoot. Here’s the sample application - SpringBoot-Docker-ECS-Example.
Let’s Dive In
Now we’re all set to dive directly into the steps, from creating a docker image to pushing it to AWS ECR and finally deploying to AWS ECS.
Step-1: Creating a repository using ECR
Amazon Elastic Container Registry (Amazon ECR) is a fully managed container registry that makes it easy to store, manage, and deploy Docker container images. It provides an ability to save configurations that help us quickly move our images from Development to the Production environment reducing overall workloads.
The following are the steps to create a repository in AWS ECR:
-
Go to AWS management console
-
Search for ECR
-
Hit Create repository
-
Provide Repository name
-
Leave other options to default
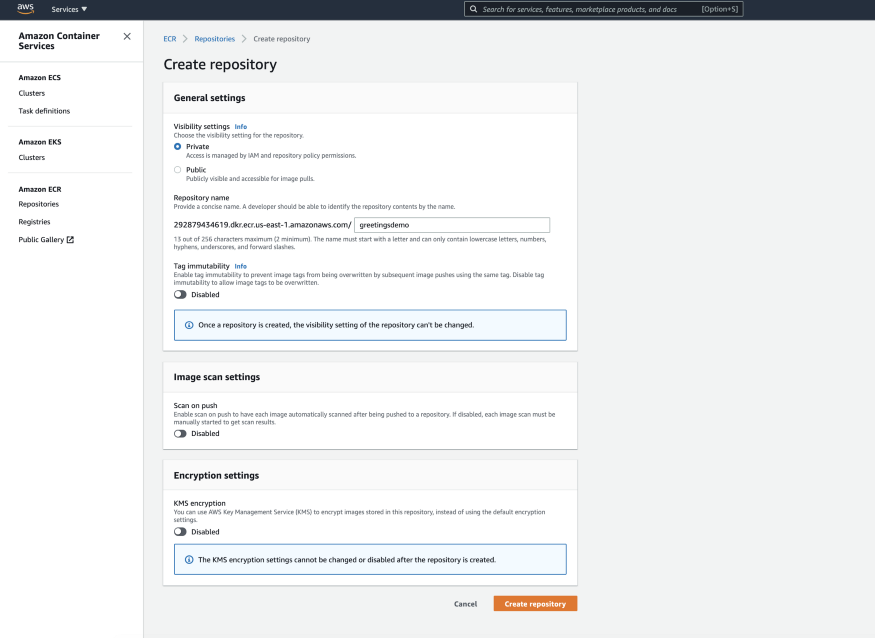 1. Repository creation page
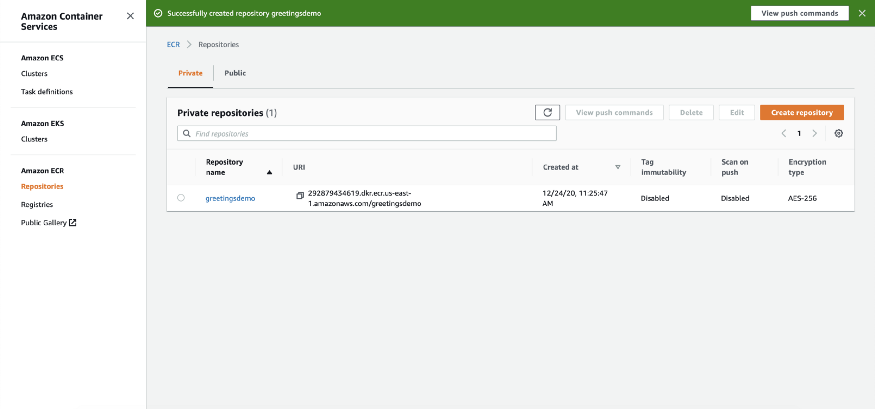 2. The repository has been successfully created
And we’re done. It’s that simple to create a repository!
Step-2: Creating a docker image and pushing it to the newly created repository
Assuming you have already created/updated an application using/to the latest version of SpringBoot. If not, then don’t worry. I’ve created the sample application - SpringBoot-Docker-ECS-Example.
Now, let’s create a docker image and push it to our repository. The following are the steps to create a docker image:
-
Open terminal/command prompt
-
Navigate (cd) to the project folder
-
Run to build the docker image. More details on SpringBoot-Docker
$ mvn spring-boot:build-image
-
Run to list all docker images
$ docker image ls
-
Copy the repository & tag id specific to the application and execute the following command to run the app in local:
$ docker run --tty -p 8080:8080 demo:0.0.1-SNAPSHOT
-
Now, open a browser and hit http://localhost:8080 to verify it’s up & running
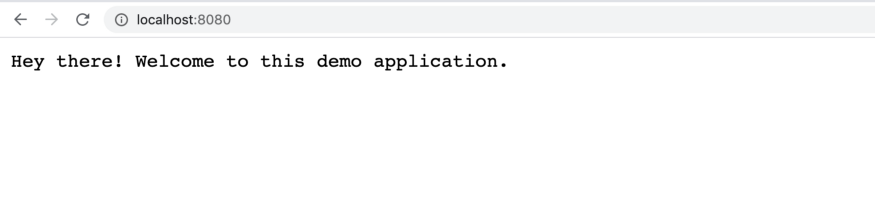 3. Application successfully running on local
We’ve successfully created a docker image. Now let’s authenticate ourselves, tag the image, and push it to the repository.
-
Go to AWS ECR panel
-
Open the repository
-
Click on the View push commands located on the top right of the window
-
You’ll get a pop up as below with all the push commands. For this exercise, skip the second command as we’ve already created the docker image.
-
In the third command, replace the tag id with the one we got after building the image i.e. demo:0.0.1-SNAPSHOT
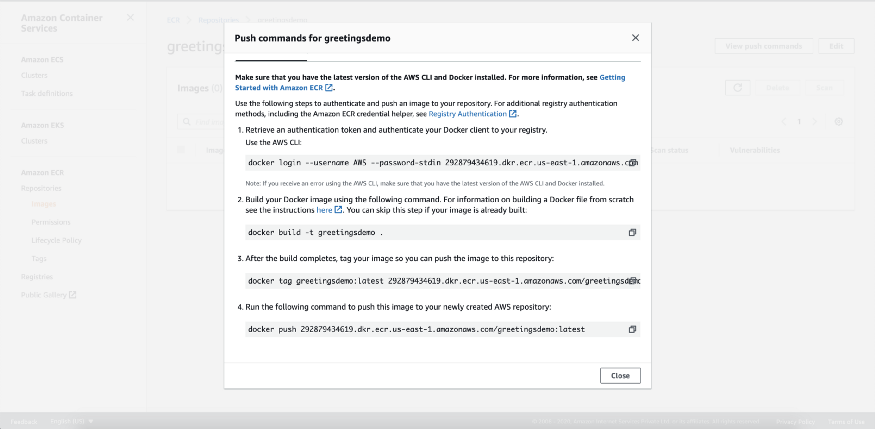 4. AWS ECR — Push commands
The first command will retrieve an auth token which will be used to authenticate our docker client and allow it to push the images to the ECR repository. Once it’s done, we have to tag our image (or build if it’s not already done). A Docker tag is an alias to the ID of an image that looks something like “0e5574283393”. By default, an image is given the latest tag if it’s not provided explicitly. At last, we have to run the docker push command to push the tagged image to our newly created repository.
For the first time, it’ll take some time to build & deploy the image. Now, you can go to ECR, open the repository, and you’ll see the uploaded image. Let’s copy the image URL as we need it in our next steps.
Step-3: Creating ECS Cluster
An Amazon ECS cluster is a grouping of container instances running tasks, or services that use the EC2 launch type. Also, if we’re using the capacity providers, we can define a cluster as a logical grouping of capacity providers.
We can create an ECS cluster as per our requirements/needs. You’ll find all the steps to create an ECS cluster in the following video:
5. Steps to create an ECS cluster
A VPC is created by default for a new account, so select the default VPC followed by subnets — select the first one from the drop-down, and the default security group. If we want to allow SSH to EC2 instances, we have to create a key pair and assign/select it while creating the cluster.
Step-4: Creating Task Definition
Task definition is a blueprint that describes how docker containers should launch which is similar to an AWS feature called Launch Configuration (an instance configuration template) except it is for a docker container. The definition contains settings like docker image, exposed port, CPU shares, memory requirement, the command to run, and environmental variables.
Whereas the task is a running container with these settings. We can think of it as an instance of a Task Definition and the container instance is just an EC2 instance that is part of an ECS Cluster that has docker and the ecs-agent running on it.
We’ll be using the image URL from AWS ECR while adding the container. The following video will show you the step-by-step process of creating a task definition:
6. Steps to create a Task Definition
If you’re creating the task definition for the first time, the Task execution role will be created by default.
Step-5: Creating ECS Service
We can define an ECS service as the long-running tasks of the same Task Definition. In other words, the ECS service enables us to run and maintain a specified number of instances simultaneously in an ECS cluster.
Let’s go through the video to know how to create a service and complete our final step:
7. Steps to create an ECS service
Once we create a service, go to clusters and check. There, you’ll see that one task has been created automatically and is in the running state under the Tasks tab with the latest task definition. However, if you want to create a task manually with the desired task definition, you can follow the below steps to do so:
8. Steps to create a Task
Try to keep the task memory below 1 GB as in the earlier step we’ve allocated around 1 GB to our ECS cluster. If we assign our task the same or more memory than our cluster, the task will fail to start with the below error:
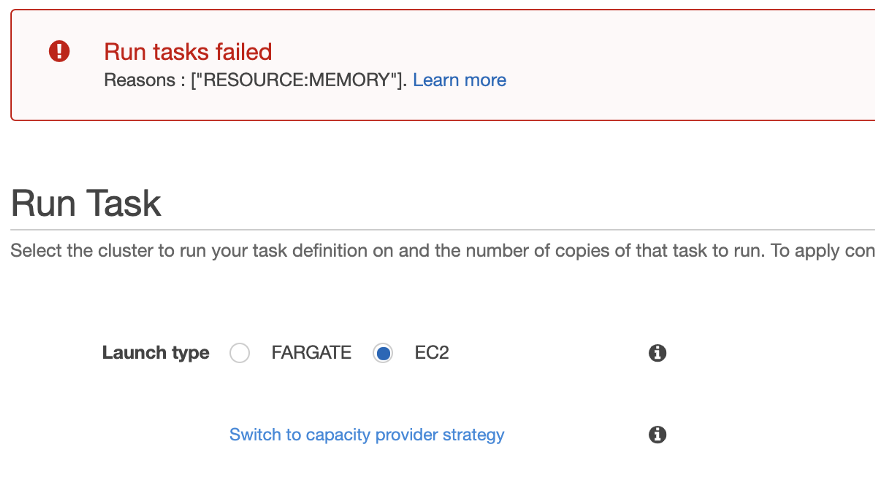 9. Error while starting/running task
And that’s all we have to do to create and deploy the docker images on AWS ECS.
We’re All Set
On the local machine, we used the localhost URL to access our application. But wait, now we’re running our application on AWS. How can we access our app now?
It’s pretty simple,
-
Go to EC2 instances
-
Select and open the details of the instance which just got created
-
Copy either Public IPv4 address or DNS
-
Open it with port 8080, something similar to what is shown below
-
Enjoy!
 10. EC2 instance details
Wait, something’s not right! We’ve successfully followed all the steps but are still not able to access the address/service, it’s getting timed out. Don’t worry, it’s because of the security groups. A security group acts as a virtual firewall to control the incoming and outgoing traffic. If you remember from our earlier steps, we selected the default security group which includes an outbound rule that allows all outbound traffic only.
Let’s create a new security group and allow inbound traffic over ports 22 (SSH) and 80/8080 (HTTP). The following video will help you with the steps:
11. Creating and associating security group
Once done, it should now be accessible over HTTP. Try hitting the same address and verify.
 12. Accessing app through Public IPv4 DNS
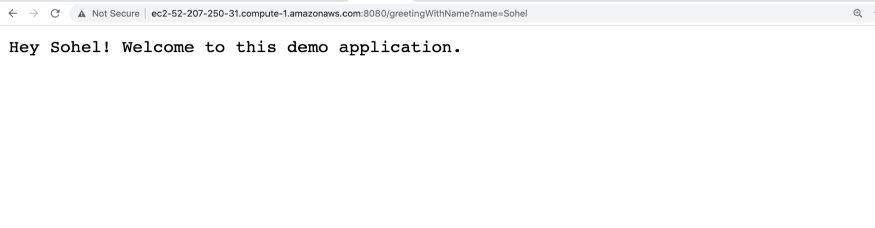 13. Accessing greetingWithName API through Public IPv4 DNS
Congratulations! You have successfully set up your first ECS cluster and deployed a docker image on it.
Accessing logs
We have already configured the logs to be handled by CloudWatch in Step-4. The following are the steps to access them:
-
Go to CloudWatch
-
Select Log groups under Logs from the left panel
-
Search for the respective log group. In this case, it’s /ecs/greetings-task-definition
-
Select the log stream for the respective task. In this case, it’s ecs/greetings-container/c53e876aaefa478b8b4317dc0386075a
-
And that’s all. You’re now looking at all Log events for the task — c53e876aaefa478b8b4317dc0386075a.
Conclusion
This is it! Now we know all the steps, right from creating a docker image to deploying/running it on the top of a cluster of EC2 instances in AWS ECS.
There’s one more service/launch type called Fargate that you can choose and explore instead of the EC2 launch type. Fargate is a serverless compute engine for containers that can be used to eliminate the need to choose instances and scale cluster capacity. This makes it easy for us to focus on building our applications rather than choosing/setting up all the other things. Also, learn about the security best practices — AWS S3 Data in our blog here.
At Clairvoyant, we provide you with the best cloud based services for all your business requirements. Reach out to us and experience the best cloud services.