Commit, Build, Deploy
Lambda is all fun and games until you need to continuously deploy functions stored in a git repository. To continuously deploy Lambda functions managed by Github, we’ll utilize AWS Pipeline and AWS CloudFormation. Each branch of the code (dev, qa, prod) will create a Lambda function with the following naming convention: <function-name>-<branch>.
Pre-Requisites
Before getting started with AWS, let’s set up the Github repo.
-
Create a repo. Add branches for dev and qa
-
❗️In the root folder, create a file called buildspec.yaml and add the code HERE
-
Create two directories in the root folder: function and scripts
-
❗️Save the code HERE as deploy.sh under the scripts directory.
-
Add the lambda function under the function directory
Great! Now let’s set up an S3 bucket to store the artifacts.
S3 Bucket
-
Navigate to S3 in AWS Management Console
-
Create an S3 bucket to store the build artifacts containing zipped versions of the lambda functions. Name it <app_name>-lambda-code-pipeline
-
Create three folders: dev, qa, and prod
Next, let’s set up the IAM role that’ll be used by CodeDeploy to deploy Lambda functions through CloudFormation.
IAM
-
Navigate to IAM in AWS Management Console
-
Click Roles on the left menu
-
Click “Create Role”
-
Select “CloudFormation” from the AWS Service List
-
Click “Next”
-
❗️Click “Create Policy” in the top left. A new tab should open to create a custom policy. Add the code HERE and update the variable values as defined at the top of the file.
-
Click “Review Policy”
-
Ensure everything is correct and save the policy as cf-lambda-policy
-
Once the policy is created, navigate back to the Roles page and click the refresh icon
-
Search for the policy created above (e.g. cf-lambda-policy) and add it to the role
-
Click “Next:Tags” to add tags. Click “Next” to review
-
Ensure everything is correct and provide a name for the role, such as cf-deploy-role
-
Click “Create Role”
Now, onto creating the Code Pipeline!
CodePipeline
CodePipeline allows us to create a continuous deployment process using CodeCommit, CodeBuild, and CodeDeploy.
The process below shows how to create the pipeline for the dev branch.
🔁 Repeat the process for qa and prod.
-
Navigate to CodePipeline
-
Click “Create Pipeline”
-
Name the pipeline <app_name>-<env>. Set it to <app_name>-dev for starting off
-
Select “New Service Role” under the Service Role menu
-
Keep the default service name that is generated
-
Click “Next” to set up the source details
Source
-
Under Source Provider, choose “Github”
-
Click “Connect to Github.” Follow the prompts to connect with your account
-
Select the Github repo you created earlier and dev from the branch
-
Select “Github Webhooks” for the Change Detection option
-
Click “Next”
CodeBuild
-
Under Build Provider, select “AWS CodeBuild”
-
Select the region of the CodeBuild project
-
Click “Create Project”
-
Enter a project name, such as, <app-name>-<env>-build
-
Under Environment Image, select “Managed Image”
-
For Operating System, select “Amazon Linux 2”
-
Under Runtime, select “Standard”
-
Under Image, select “aws/codebuild/amazonlinux2-x86_64-standard:3.0.”
-
Set Environment Type to “Linux”
-
Under the Service role, select “Create a New Role”. Enter a name for the role, such as <app_name>-<env>-build-role
-
Under Additional Configuration, click “Add Environment Variables”
-
1️⃣ Set key to S3_BUCKET; set value to the name of the S3 bucket where the artifacts will be stored
-
2️⃣ Set key to LAMBDA_FUNCTION_NAME; set value to the name of the Lambda function to deploy
-
3️⃣ Set key to BRANCH; set value to #{SourceVariables.BranchName}
-
4️⃣ Set key to LAMBDA_DEPLOYMENT_PREFERENCE; set value to a type of deployment (e.g. Canary10Percent30Minutes, Linear10PercentEvery1Minute, AllAtOnce)
-
Under Build specifications, select “Use a Buildspec file”
-
Optional: Select S3 Logs under the Logs section if you’d like logs to also be written to an S3 bucket
-
Click “Continue to Code Pipeline.”
-
Ensure that the build project you just created has been selected in the Project name dropdown
-
Leave Build type as “Single Build”
-
Click “Next”
IAM Update
🔀 Detour: let’s update the IAM role created above for CodeBuild to provide access to S3 since the build process copies the code to S3.
-
Navigate to IAM
-
Click on Roles in the left menu
-
Search for the role name created above
-
Click the role name to open it
-
Click “Attach Policies”
-
Click “Create Policy”
-
Click on the JSON tab
-
Copy the code HERE into the editor. It will give access to the S3 bucket and the Dynamodb table. ⚠️ Update the variables listed at the top of the code and delete those lines once the variables have been updated⚠️
-
Click “Review Policy”
-
Enter a name for the policy, such as code-build-s3-lambda-policy
-
Click “Create Policy”
-
Click the Refresh icon on the Policy page
-
Search the name of the policy just created and add it to the role
-
Click “Attach Policy”
Great! Now, the CodeBuild role has S3 and Lambda access. Time to move on!
CodeDeploy
-
For the deploy provider, select “AWS CloudFormation”
-
For action mode, select “Create or Update a stack”
-
Enter a name for the stack to be created, such as, <app-name>-cf-stack
-
Under Template, select “BuildArtifact” from the Artifact name dropdown
-
Enter packaged.yaml for the file name
-
Select CAPABILITY_NAMED_IAM and CAPABILITY_AUTO_EXPAND under capabilities. Learn more about these permissions HERE.\
-
Under Role Name, select the CloudFormation role created earlier (cf-deploy-role)
-
Click “Next”
-
Ensure everything is accurate. Click “Create Pipeline”
-
⚠️ Once the pipeline is created, it’ll automatically be triggered for the first run
Tracking Progress
CodePipeline
-
Navigate to CodePipeline
-
Use the UI to track the progress of each stage of the pipeline
-
Click View Details under each stage to get more information and debug in case of failures
CloudFormation
-
Navigate to CloudFormation
-
Click on the stack created earlier
-
Click on the Events tab in the stack details
-
Click the refresh button in the top right corner to refresh the events list and track the creation/updates of the stack
-
Note if any errors occur and work towards resolving them
CodeDeploy
-
Navigate to CodeDeploy
-
Click Deployments on the left menu under CodeDeploy
-
Click on the Deployment ID of the deployment just created and track the progress through the UI. It might be instant or take 10 mins based on the deployment preference you specified earlier
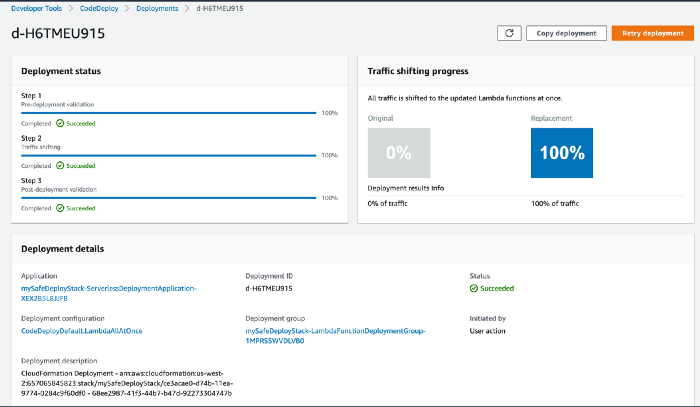 CloudFormation triggered CodeDeploy Deployment
S3
-
Navigate to S3
-
Open the bucket created earlier to store the artifacts
-
It should now contain the versioned lambda code in zip folders
Lambda Function
-
Navigate to Lambda in AWS Management Console
-
Click Functions
-
Look for the function that you specified earlier as an environment variable (LAMBDA_FUNCTION_NAME)
-
Open the function by clicking on the function name
-
Click on the Qualifiers dropdown in the top-right and you should see the Lambda versions and the alias default
-
That’s it! You’ve covered all the bases and ensured that all components are functioning! Now, just push changes to Github and it should automatically deploy the code to Lambda 🍻
Common Challenges
1. CloudFormation Stack Status: UPDATE_ROLLBACK_COMPLETE
-
The first run of the pipeline fails at the deployment stage when creating a stack. You attempt to retry the deploy stage but get the following error: Failed to update stack. Current status: UPDATE_ROLLBACK_COMPLETE.
-
Once a stack has been in the ROLLBACK state, it cannot be updated. You MUST delete the stack before proceeding.
-
Navigate to CloudFormation
-
Click on Stacks to get the list of stacks.
-
Find the stack that was created by the CodePipeline.
-
Click the radio button next to it and click Delete.
-
Make changes to the pipeline and try again. 🔁